 |
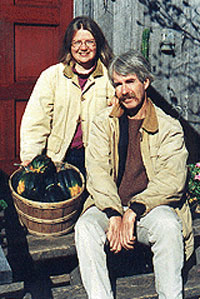
| Tim and Jan King. Photo from wholefarmcoop.com by Kristen Corselius, used with permission. |
By Tim King
Since 1986, our farm has used a system of raised beds, drip irrigation, plastic mulch and fabric row cover tunnels. We’ve used this system or parts of this system for frost protection, weed control, irrigation, microclimate enhancement, moisture retention and insect control for 1000 to 4000 feet of warm season and brassica crops.
Tractor drawn equipment is available to install most of this system. When we decided to begin using row covers and plasticulture, however, we had already purchased a fairly expensive walk-behind rototiller. So we decided to raise the beds, lay the drip line and plastic mulch, put in the hoops, and roll out the row cover by hand. This is very labor intensive, but we’re pleased with our decision and would not consider buying machinery to do the work.
One of the principal reasons – besides stubbornness – that we’ve been pleased with our self designed machinery-less system is that it gives us flexibility to hybridize. Last season we had 800 feet of muskmelon, watermelon, dry flowers, eggplant and bell peppers that utilize the entire system – from raised bed to fabric row tunnel. But we also used a variation of the system on 120 feet of tomatoes and brassicas; these didn’t have raised beds and plastic mulch, but instead used straw mulch over the drip line.
Also last season, for the first time, we put row cover tunnels over 300 feet of direct seeded squash to protect the emerging plants from a cucumber beetle infestation that we’d experienced the two previous seasons. But the squash bed was not raised, did not have plastic mulch, and was irrigated using overhead sprinklers. We weren’t overly impressed with the direct seeding experiment, but we were mighty impressed with a system of squash transplants, row covers and overhead irrigation.
Additionally we used the row cover as an infirmary for gourd and squash plants that were set out but languishing. As a result, the sickly plants that would not have yielded provided a modest yield after being protected by Reemay for a month.
 |
| Tim and Jan King have developed a system of using drip irrigation, mulch, row covers and beds at their Maple Hill Garden in Long Prairie, Minnesota. Jan King photo. |
We also like the nonmechanical approach because it allows us to reuse much of the material a second and even a third season. For years we’ve reused the fabric row cover for two to three seasons. After it’s too shredded for use over the hoops, it can protect crops such as beans or grapes from late frosts. We’ve also discovered that we can reuse some of the black plastic mulch for a second, and occasionally third, season.
How Our Hand Operated System Comes Together
Our first spring task is to pick up last season’s plastic mulch. Before we began reusing plastic, I’d pick it up in the fall if I had time. But if you want to reuse the plastic, let the winter do it’s work on the melon vines and other plant material before you try to pick up 300 feet of 3-foot-wide plastic mulch in one piece. Regardless, picking up mulch is messy, painstaking work. I must admit that Janice, my gardening partner of many years, does most of this. She has more patience. As she picks up the plastic, she puts it into a feed sack carefully so that it will come out end first and in an orderly and untangled way. When the bag is full, she labels it with the number of pieces in the bag and their approximate length.
When the plastic is being removed, it’s easy to think, “Ugh – what am I doing with all of this disgusting petro-byproduct?” After 18 seasons, that remains a valid question for me. Part of the answer is that under the mulch is a weed free, moist, biologically active zone of soil that has required no tillage since the plastic was applied. And under that plastic, little or no soil compaction has occurred, and the soil quality is superb.
So, we proceed. Our garden is set up in fourteen 300-foot beds that are largely permanent and set up on 6-foot centers. With our crop rotation, a bed would rarely get raised and covered two consecutive years. So we have to till and raise selected beds next. Often a bed to be raised this season will have been fallow last season. Our system of fallowing and rotation often lets quackgrass creep into fallow rows. So this bed to be raised may have perennial grass in it. This season we took a 75-foot, grassy, retired raspberry row, and raised and covered it. The plastic will hold the grass in check nicely.
The tools for raising a bed are simple. We use our garden tiller to make a pass or two through the 2- to 3-foot-wide bed. Then, using a pickup truck or hand cart, we generously compost the bed and once again till to incorporate the compost. Next, using a steel rake or a three-pronged hoe, we pull a few inches of soil from one side of the bed into the middle. That leaves a mound of soil 4 or 5 inches high and as long as the bed. We repeat the process on the other side of the bed by raking more soil to the center. When we’re done, the mound in the center may be 10 inches high.
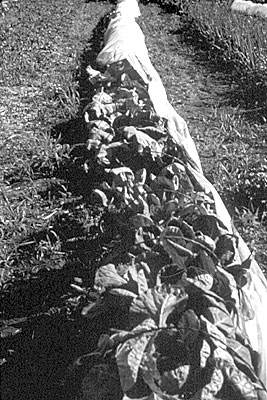 |
| Row covers are left on until the plants push against the fabric. Jan King photo. |
Next we gently level the top of that raised mound with the rake. Depending on how much soil you’ve mounded, you should end up with a fairly flat bed 14 to 20 inches wide and 6 to 8 inches high.
Now we lay two lengths of drip line onto the surface of the bed. We used the thin walled T tape last year where we needed new lines. We buy splices and patch the older lines where the pocket gophers have bitten into it. If we use new drip line, we put the spool of new line on a pipe and mount the pipe on our garden cart. Keeping the cart stationary, at one end of the row, we walk the line to the other end of the bed. We connect only one of those lines for widely spaced crops, such as melons. The second line is a backup. Since we plant two rows of peppers and flowers in each bed, we connect both lines in these beds.
Now we lay the plastic if we’re going to use it. With old plastic, one of us pulls 10 or 15 feet out of the bag after we’ve anchored the end with a little soil at the beginning of the row. Then one person stretches and holds the plastic taut and the other person anchors it at that end with soil. Once the two ends of that section are anchored, the stretcher finds two or three strategic spots along the length of the section and stretches the plastic as wide as possible. The edges of those spots are anchored. Now both people can lightly anchor the edges of the entire, nicely tightened section. This process is repeated for the length of the bed. As we go, we remove debris – corn stalks, broccoli roots, particularly noxious grass rhizomes – that prevents the plastic from lying smooth. We also adjust the drip line regularly so that it’s tight and lying where we want it. We’ve noticed that old plastic, with its randomly placed holes, requires a little less irrigation. An inch of rain will likely soak a bed covered with somewhat tattered, old plastic, while most rain runs off new plastic.
If you’re using new plastic, put a pipe through the cardboard tube that holds the roll of plastic, then two people can roll out sections of it. The same tightening and anchoring system is used as with old plastic. I think it’s harder to lay new plastic than old. With either new or old, we can put down 300 feet in a couple of hours.
Next we put the hoops in. Our hoops are made from the wire that rural electric utilities used for overhead transmission lines. We picked a lot of the stuff up cheap when the electrical co-op went underground with its wire. We cut the hoops 3 to 4 feet long with a bolt cutter. Tomatoes and broccoli need big hoops. Melons can get by with shorter ones. In the bed the hoops are 2 feet apart. The ends are poked through the edge of the plastic mulch, anchoring it further, and into the ground.
We transplant and put the row cover on as one step. We’ll put out 15 or 20 feet of transplants, then immediately cover them with row cover. We poke holes for transplants into new plastic with a sharp stick. Before you transplant though, you might want to run your tiller along the edges of the bed. Having loose soil to anchor the edges of the row cover makes life easier than having to scoop compacted soil for 300 feet. That loose soil is also nice for putting little dirt collars around the each transplant. Those dirt collars protect any delicate leaves that would otherwise contact the hot plastic. When we come to the end of a piece of row cover in the middle of a row, we attach it to a hoop with clothespins. The new beginning can be joined at that hoop also.
Everything I’ve ever grown – from weeds to melons – grows better under this man-made system than out in the open. It’s warmer. It’s wetter. The light is diffuse. It’s wind free. It provides 4 degrees of frost protection. Consequently we don’t remove the fabric cover until we have to. For melons we wait until the first female flowers show. On tomatoes and peppers we wait until the plants are pushing against the fabric.
Once we take the fabric off we put it right into bags. The sun is hard on it.
Tim and Jan King farm in Long Prairie, Minnesota. Join Tim for his online course, “Certified Organic Food: What is it? Who Grows It?” at www.suite101.com/course.cfm/18004/overview/229462