 |
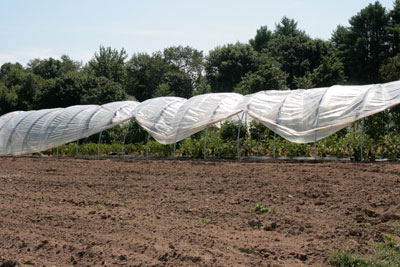
| A caterpillar tunnel. |
By Eric Sideman, Ph.D.
Photos by the author.
As you read this in December, you are probably already looking forward to next year’s tomatoes, but as I write this in mid-October, I am looking out my window at very dead tomato plants in my garden.
Sadly, most tomato plants in gardens across Maine and the rest of the Northeast died before summer ended, as they do almost every year. This is OK with me, as most of my tomato plants are still doing fine – because most are in a high tunnel.
We grow only paste tomatoes outdoors in a garden, because most garden tomatoes (including mine) succumb to disease by late summer. This decline is by far the most common problem about which people contact me. I have lots of advice, but I warn folks that although they may be able to stave off the problem for a while, their plants likely will succumb.
The difference between my tunnel tomatoes and garden tomatoes is that the leaves of plants in the garden or field get wet, and moisture favors fungal growth, while leaves in the tunnel are relatively dry.
This year at the Common Ground Country Fair, when Mark Hutton (vegetable specialist with UMaine Cooperative Extension) and I were doing our normal Q&A session, tomato problems dominated the discussion. Then and there we both realized that it is not a far-fetched idea for even small-scale gardeners to cover their tomatoes. Hence this column about common tomato diseases and the basics of building a simple, inexpensive tunnel to protect tomatoes.
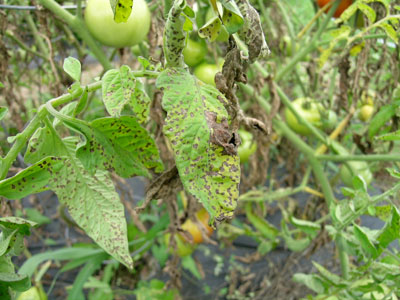 |
| Septoria leaf spot on tomato. |
The diseases that most commonly cause the demise of tomatoes are Septoria leaf spot and early blight. Many callers tell me their plants are dying from late blight, but that is actually rare. The pathogen that causes late blight can survive from season to season only on living tissue. Since tomatoes do not overwinter in the Northeast, even if you had late blight one year you are unlikely to get it the next. The late blight pathogen generally can overwinter here only in the potato tuber, a living bit of the plant. If tubers are destroyed (actually, simply allowed to freeze on the surface of the ground), the pathogen does not survive to infect the next season’s crop.
In contrast, the pathogens that cause early blight and Septoria leaf spot can survive from one season to the next on even microscopic bits of dead tissue, which will be the source of infection the next season. Usually early rains splash up spores from these bits of tissue in a garden, and the spores land on tomato leaves. If the leaves are wet, the spores germinate and infection begins. This explains at least partially why these diseases start on the lower leaves and work their way up the plant.
The first recommendation to avoid these diseases is to do anything you can to prevent spores from splashing. Fall cleanup helps, as does covering the soil with mulch when you plant in spring. However, these recommendations only delay the onset of the diseases, because while the initial infection of plants originates from bits of last season’s overwintered dead plants, by midsummer the air is full of spores coming from new infections around the neighborhood. Many area farmers and gardeners may not have done well at preventing the initial infection, and now spores are blowing in the wind. If a spore happens to land on the leaf of a tomato plant that stays wet long enough, the spores will germinate. The disease is off and running, producing more spores to blow in the wind.
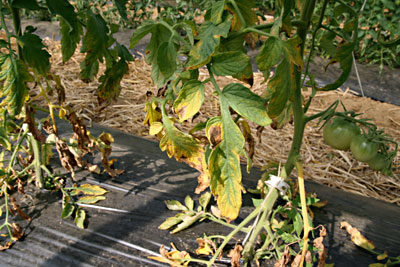 |
| Early blight on tomato. |
By midsummer the only protection (besides chemicals that kill the fungus) would be to keep the leaves dry so that the spores cannot germinate. This is hard to do outside in the garden or field, especially in a wet season. And this is one of the main reasons nearly all farmers around here now grow their tomatoes under cover in a high tunnel.
Gardeners and small scale farmers can do a lot to keep tomato leaves drier, such as spacing plants far enough apart to allow for air movement, managing weeds, staking and properly pruning plants, using drip instead of overhead irrigation, etc., but if it rains, the leaves get wet. So I am suggesting that it may make sense to build a small, inexpensive tunnel to cover your plants.
One design that I think can make sense even on a small scale is a “caterpillar tunnel.” The picture with this article shows where that name came from: The rope holding the plastic on pulls it down between the bows, giving the structure a caterpillar appearance.
The caterpillar tunnel in the picture is probably 50 feet long, but a gardener could build one that is only 12 feet long. This would go a long way in protecting the crop from common diseases such as Septoria and early blight, and the bit of extra warmth may promote ripening. I envision a small garden-size tunnel also giving basil some protection from downy mildew, helping peppers color up, and producing some early-season staked cucumbers.
Building a caterpillar tunnel is easy. I made one with 20-foot pieces of 1.25-inch PVC pipe bent to form a bow. Each bow is held in place by driving a piece of rebar into the ground on each side, about 15 feet apart, then slipping each end of the pipe over the rebar to form the bow. That makes a tunnel high enough to walk in. Bows are set 4 feet apart, and you can make you tunnel as long as you want by adding bows. A 12-foot-long (4-bow) tunnel would be great for a gardener.
Run a piece of rope along the top of each bow and anchor it to a stake at each end of the house. This keeps the bows from leaning toward the long direction of the tunnel.
Cover the structure with greenhouse plastic. (Construction plastic will fall apart halfway through the season, because it lacks protection from UV light.) Hold the plastic in place with rope across the top of the house between each bow. Buy a piece of plastic wide enough to give a few feet extra on each side to weight to the ground, and about 10 feet extra on each end to bunch and tie to a stake.
Keep the structure closed at night for a little protection from cold and to get ripe tomatoes about a month earlier. (You can transplant your tomatoes into the tunnel in mid-May instead of early June.)
This structure will get very hot on sunny days so it must be opened each morning for ventilation. Open it simply by pulling the plastic up as seen in the picture. Hold it up with a clamp; or, if your rope is tight enough, that may hold it up.
It may seem over-the-top for a gardener to build a caterpillar tunnel just to grow some tomatoes, but for those who love BLT sandwiches, it is not far-fetched.
Eric is MOFGA’s organic crop specialist. You can reach him at 568-4142 or [email protected].