 |
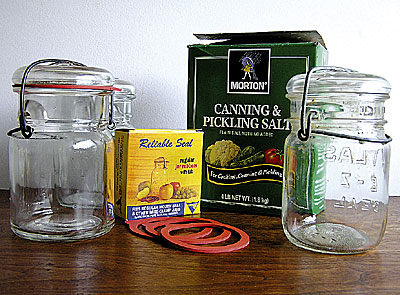
| Vegetables can be fermented in glass jars of various sizes, with rubber gaskets and wire bails, using non-iodized salt (such as sea salt or pickling salt) and non-chlorinated water. A scale is essential to get the right ratio of vegetables to salt. |
By Roberta Bailey
One way that I coped with the interminable rains of June and July was to visit old friends, many of them exceptional gardeners and farmers, the cream of the organic crop. As we dined on delicious homegrown fare and shared our enthusiasm for new projects (worm compost, solar hot water, compost bins built to accommodate a bucket loader) or laughed over past foolishness (red potatoes being poured into the cider press, dahlia bulbs from the root cellar added to a stir fry), I was repeatedly struck by how much knowledge was at the table. Each of us brought 30 years or more of trial and error. Each of us could write a book or three. Some had.
We are all enthusiastic students in the science of organic life. That curiosity and drive to keep learning or improving life skills has propelled us all through decades of living on the land. We get recharged every time we get together to share a meal or do a project. Then we return to our farms and continue with the day to day of it all, but reminded of how important it is to take time to visit with each other. In the end, one remembers the visits, not the weeds that got pulled a few days late.
As I sat at each friend’s table, I shared my enthusiasm for lacto-fermented foods. I was re-inspired by a presentation by Roy and Ana Antaki at MOFGA’s Small Farm Field Day and by the crisp, fresh taste of their lacto-fermented vegetables. And by how healthful these foods are: Lacto-fermentation partially digests vegetables, synthesizing vitamins and making them more available to our bodies, especially B vitamins. They are also high in vitamin C, and benefit our reproductive, digestive and immune systems.
Lacto-fermentation involves natural bacteria that reside in the vegetables and the air. Lactobacillaceae is a large family that includes Lactobacillus acidopholous (the “culture” or bacteria used to make yogurt). These lactic acid bacteria convert lactose and other sugars to lactic acid.
After the Antakis’ Weeping Duck Farm was profiled in the December 2005 issue of The MOF&G (available under “Publications” at www.mofga.org), readers asked for more recipes and specific lacto-fermentation techniques. So, with the Antakis’ permission, I share those here.
How To Ferment
Instead of crocks, Roy and Ana use 1/2- to 5-liter glass jars with rubber gaskets and wire bails. (Luminarc and Fido brands are available online, in some kitchen supply stores, at the Winslow Agway and in Bed, Bath and Beyond stores.) As food ferments, pressure builds inside the closed jar. When the pressure is greater inside than outside the jar, the gasket allows gases or briny liquid to escape. A gas seal is created, so that even when vegetables are above the liquid they will not spoil. (So, do not open the jar until you are ready to eat the contents, as this will break that seal.)
Lacto-fermentation uses only clean, fresh vegetables, non-iodized salt (such as sea salt or pickling salt) and non-chlorinated water. Any mixture of vegetables can be used. I tried the Antakis’ broccoli and cauliflower and it was crisp and delicious after two years. It was not strongly flavored, just very lightly salty. Although you use salt in lacto-fermentation, the end result is not highly salty.
You will also need a large stainless, glass or pottery bowl, a scale to weigh vegetables, and clean jars.
Wash the jars and bowl in hot soapy water.
Wash and trim the vegetables, cutting them (by hand or in a food processor) to the sizes you want to eat.
Weigh the vegetables. This is critical, as the correct salt to vegetable ratio determines success. For every 5 pounds of vegetables, you will need 3 Tablespoons of salt. Layer the vegetables and salt alternately in the bowl and mix them thoroughly.
Stuff the mixture into clean jars, packing aggressively, and filling them to the neck of the jar. Do not overfill, as liquids can overflow the jar and corrode the wire bail.
The packing process will start to draw liquid from the produce. To keep the vegetables down in the jar and below the liquid during and after fermentation, the Antakis use 7 1/2-inch wooden beverage stirring sticks broken in half and placed in the jar cross-wise in a star formation just below the neck of the jar.
After you have bottled your produce, clamp down the glass lid over the gasket. Store the jar at room temperature.
After about a day, little bubbles will rise to the top and settle in a ring around the neck of the bottle. Fermentation has begun. Once you see a thick necklace of bubbles, fermentation is well established.
You may wish to place a dish below the jar in case it was over-filled, as liquid may overflow.
A cloudy liquid is normal and results from yeast activity. After fermentation has ended, the cloudy liquid will settle to the bottom.
Once fermentation is well established, place the jar in a root cellar or cool, dark place where it will continue to ferment more slowly. Indirect light is okay. (The Antakis’ root cellar temperature ranges from 62 F in midsummer to 34 F in winter.) Over time there may be no discernable bubble activity.
Store the jars in the cellar, unopened, until you’re ready to eat the product.
The Antakis recommend letting the jars sit and work for at least two months. I started eating kimchee after two weeks, and it was delicious, but I say this just to let you know it is okay to eat earlier. Make a few batches and let some wait. Sealed, these vegetables are good for at least a year, and I can vouch for the delicious crispness of the 2-year-old vegetables the Antakis fed us at Small Farm Field Day.
When you open a jar, be aware that the contents are still under some pressure, so some bubbles may rush to the surface. Just wait a minute and then continue to open it.
If you like your pickles more sour, add a little sugar (1/2 to 1 teaspoon per 5 pounds of vegetables) to feed the Lactobacillus bacteria longer. Ana says she has never wanted her vegetables that sour, but if you want to experiment, start with a small amount first.
To make vegetables even crisper, add grape, oak or fresh, unwilted sour cherry leaves to the jar. For grape or oak leaves, layer a few on the bottom then a few on top. With sour cherry leaves, Ana suggests the same, but add enough to create solid top and bottom layers or to intersperse them. She says this is not an exact science.
Use any combination of vegetables. Mix, match and experiment to discover your favorites. Try a little beet for color or some hot pepper or horseradish for zip. And what about cranberries? Green beans, carrots, cucumbers, garlic, shallots, beets, cauliflower, broccoli, cabbage, Chinese cabbage and bok choy all lend well to lacto-fermentation.
Sliced Cucumbers
(Brine is not required as the vegetables release their own liquid by action of the salt and the pressure)
3 Tbsp. sea salt
Wash and weigh the cucumbers, then slice them to the desired thickness or into spears. Layer them in a large bowl alternately with salt. Mix very thoroughly. Place them in the clean fermentation jar and press them down. Add wooden stir sticks at neck level. Close the jar and let it sit at room temperature until fermentation is complete, then store it in a cool place.
Sauerkraut or Sauerruben
3 Tbsp. sea salt
Wash, trim and shred the cabbage/rutabaga/carrot. Weigh it to get 5 pounds. Layer the vegetables with sea salt in a large bowl, then pack them aggressively into a clean jar. Place clean wooden stirring sticks in a star position at the neck of jar to keep the kraut below the liquid. Close the jar and allow the vegetables to ferment for three to 14 days, until fermentation has stopped, then place it in a root cellar or other cool, dark place.
Cabbage Kimchee
1 lb. white/daikon radish
2 Tbsp. finely minced fresh ginger (or to taste)
1 1/2 Tbsp. minced garlic
5 scallions with tops, finely sliced
1 Tbsp. hot pepper or to taste
Prepare a brine of 5 cups of room temperature water and 2 Tbsp. and 2 tsp. sea salt. Cut the cabbage and slice the radish. Put the vegetables into a container (a food grade plastic bucket, a crock or a jar) and add enough brine to cover them by 2 inches. Press with a dish or other item so that the vegetables are completely submerged. Leave them overnight.
The next day, drain the vegetables, saving the brine. While draining, prepare the seasonings. Mix the ginger, garlic, scallion and hot pepper in a bowl. Mix the seasonings with the well-drained cabbage. Pack the seasoned vegetables into the fermentation container, pressing them down and adding brine as needed. Cover the vegetables with brine and keep them at room temperature for up to two weeks, until most of the fermentation is complete; then move them to a root cellar or other cool place. If you are using a glass jar, pack firmly, add brine, and seal and do not open the jar again until you eat it.