 |
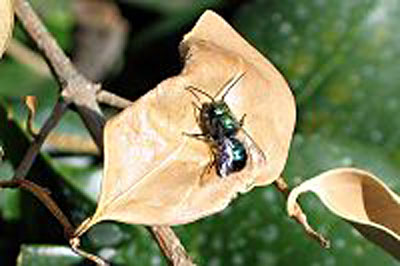
| Blue orchard bee. From https://en.wikipedia.org/wiki/Blue_orchard_bee |
By Adam Tomash
Photos by the author
The honeybee is the pollinator we most depend on, but other pollinators exist, and 4,000 species of feral (native) bees live in North America. Roughly one-third of these bees nest in small cavities or tunnels, such as hollow plant stems, borer tunnels and cracks between house shingles. Increased urbanization and modern building materials lacking cracks and crevices have decreased nesting opportunities for feral pollinators.
However, in our unpredictable spring climate, feral bees are the most effective pollinators for fruit trees. Honeybees do not like to work in cool, damp weather. Orchard bees (or mason bees, Osmia lignaria) work blossoms even when the weather is not ideal, and unlike honeybees, they prefer to work fruit tree blossoms even when other pollen sources are available. So orchardists benefit by providing nesting sites for orchard bees.
Blue orchard bees (BOBs, or mason bees) are not the only feral pollinators but they respond well to human encouragement and can help optimize fruit tree pollination. Provide abundant nesting sites, and the bees will come and will build their populations significantly over time. BOBs are a good fit for homesteads with small orchards in urban or suburban areas where honeybee hives are not always welcome. Orchard bee nests are small, scattered and not perceived as a threat to humans, and BOBs are not nearly as likely to sting if nests are approached.
Synergy of BOBs and Fruit Tree Blossoms
Fruit trees flower for just two to three weeks or less, and individual blooms are receptive to pollination for only a few days. They are the most receptive just after opening. In inclement weather, many flowers go unfertilized. Cool weather also impedes fertilization within the flower.
BOBs prefer to forage on fruit tree flowers. They are more efficient pollinators than honeybees because they must gather nectar and pollen from each flower and they forage in much cooler temperatures and less ideal conditions. They also position themselves within the flower in a way that ensures thorough contact with stigmas and anthers on each visit and thus promotes pollination.
BOBs are “solitary” bees; they do not live in colonies like bumblebees and honeybees. They are active only for a short period in spring. They do not overwinter as adults like honeybees. After spring fruit tree bloom ends, adults disappear and only larvae remain within nest cavities, developing into adults over the next months.
Individuals maintain separate nests, although they are gregarious and prefer living near other bees of the same species. The nest – a tube or crack with several bee pupae – holds females toward the bottom and males toward the top. In spring just before fruit trees bloom, males hatch and hang out near the nest from which they emerged. Females emerge after males, mate, and begin looking for new nest sites.
Females visit available food sources, but their main source is fruit tree flowers. The bloom period starts with cherry trees and then advances through plum, peach, pear and apple. The female visits and pollinates 75 flowers to get enough nectar and pollen to fly back to the nest to deposit her cargo. She repeats this task 15 to 35 times to get enough “provision” to feed one egg for its life cycle from egg to adulthood. She then lays an egg, attaching it to the provision before searching for mud to seal this egg chamber. She takes some 1,800 flower trips to provision one egg.
After sealing the first cell, she repeats the process, laying another female egg. When she gets to the last portion of the nest cavity, she lays male eggs. Typically she lays three female eggs and four male eggs per cavity and then seals the cavity with a thicker layer of mud. She then fills another nest cavity.
A female lives about 20 days and provisions about two to six nests. So 1,800 flower trips x 7 eggs x 6 nests = more than 75,000 flower trips in her life, making BOBs about 100 times more efficient than honeybees. BOBs pollinate 97 percent of the flowers they visit.
General Considerations for Success
I have had greatest success with nests located away from wind and weather, and attached to a large landmark, such as a building that gets a lot of sun, especially in early morning. Nests have to be firmly secured against wind. Most of mine are under eaves on the south side of my house and the east side of my garage. Both have overhangs, so nests don’t bake in the sun.
A selection of plants that bloom just before and after the primary bloom should be available to provide food for early hatches of bees (Resource 4). These plants and the primary bloom should be within 300 feet of the nesting site. The bees also require moist soil and/or water with which to make mud to partition nest cavities and seal entrances.
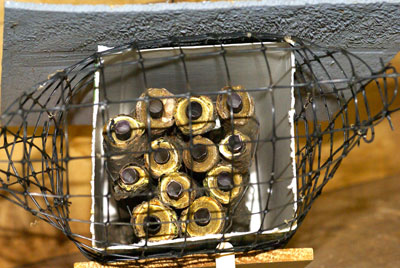 |
| Fig. 1. Twig tubes with paper liners in a cardboard milk carton covered with a cedar shingle and protected from birds with wire mesh. |
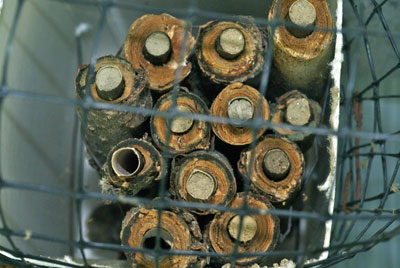 |
| Fig. 2. Close-up of 12 twig tubes with 10 filled by BOBs. |
After the mating season has ended (mid-June in Maine), you can gently remove nests and store them in a fine-mesh nylon bag with nest entrances facing up in an unheated building away from direct sun. If you use paper liners (these look like paper straws and line nest holes) and/or guard tubes (heavier, cardboard tubes), you can just remove these from the nests and store them the same way. Do not jostle nests during moving or storage or you will dislodge eggs from their provision and they will die. Nests can also be left unmanaged where they were set up in spring.
Sanitation is important. Each spring provide new cavities, sanitize old cavities or, if you used liners, put new liners in old nests. Paper liners containing larvae can be overwintered in an unheated building or refrigerator and placed in an emergence box in spring – a simple box with a hinged lid and a hole on the bottom of the front panel. Place paper tubes containing cocoons in the box, close the lid and place the box outside near new or cleaned nests. Young bees will crawl toward the light, emerge from the hole and then populate the new, clean nests. BOBs tend to nest as near to their natal nest as possible.
Resource 16 (second link) has good videos and pictures of pests and their control. Mimicking natural conditions of wide nest spacing and low population densities in each nest can also limit pest populations.
If you use BOB “condos” (page nests, below), you can open and inspect them in winter, and select and store healthy cocoons loose in aerated plastic tubs in the refrigerator. Brush debris from page channels and then disinfect them with a solution of 1 part bleach to 2 parts water. Let pages dry before restacking. If you used paper liners, you needn’t use bleach. Pollinators Paradise (Resource 3) has neat systems for “harvesting” cocoons to sell on a commercial scale.
Trap Nesting: Options for Homemade Nests
Trap nesting is a way to capture feral Osmia populations and manage them for increase by reducing normal mortality suffered by feral populations from mites, parasitic wasps, birds and diseases.
All BOB nests can be managed or unmanaged. Using paper liners can turn an unmanaged shelter into a managed one.
Management consists of placing nests after the pollinating season in a cool, dry place in mesh bags to prevent parasites and predators from infecting pupae or larvae. Either the entire nest or just paper liners with pupae inside are stored. Later you can remove, inspect and store healthy pupae loose. If you wish to inspect pupae, use either easily unwound tubes, pre-split paper tubes, the page system (bee condo) or a combination of tubes and condos.
To store larvae in straws, pull straws out of shelter tubes and store them as noted above. In late fall or early winter, open the straws and remove empty, dead or diseased cocoons. Clean good cocoons of mites (Resource 3) and store them in a cold place, such as a root cellar, unheated garage or refrigerator for release next spring. Plastic containers with aeration holes are good for storing loose cocoons or intact straws.
Using straws keeps wooden components of nests clean and reusable. Otherwise they must be destroyed or disinfected after bees emerge the following spring. This mandates using a duplicate set of nests, since bees will not usually nest in a dirty tube from which bees recently emerged. Most professionals recommend using paper straws. See Resource 19 for the most highly recommended system for trap nesting.
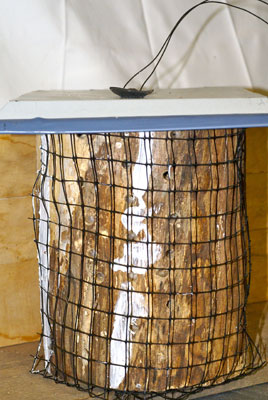 |
| Fig. 3. A log nest. |
 |
| Fig. 4. A log nest hanging in a crabapple tree. |
Unmanaged Shelter
Twigs (Figures 1 and 2)
Cut straight sections of maple saplings, sumac, bamboo or reeds into 7- to 9-inch pieces. Drill the centers out with a long, 5/16-inch drill bit to a depth of 6 inches. The holes can be slightly larger if paper liners (3/8-inch) or guard tubes (7/16-inch) are used. You want to end up with a 5/16-inch-diameter nesting cavity.
Cut pieces in random 7- to 9-inch lengths so that ends are not even when bundled together, and paint ends of twigs or paper liners black. Female bees seem to prefer dark colored entrances, and uneven ends help them identify which nest they are currently filling. Each female may make more than one tube her home nest, laying four to eight eggs in each tunnel or tube.
Wire 10 to 15 twigs together and place the bundle in a waterproof container, such as an open-ended plastic milk jug.
If birds are a certain threat, cover the ends with chicken wire or 3/4-inch plastic mesh, kept several inches from the nest ends, to protect them from birds.
Hang the container, facing south or east, from a tree. To keep nests dry during rains, hang them with a wire or rope so that the nesting holes slope slightly downward.
At the end of the season (usually mid- to late June but varying with location), move nests to a sheltered place such as an unheated shed and place the twigs in a fine mesh bag to protect them from predators and parasites. Handle nests gently and carry and store them with entrances pointing up to avoid dislodging the egg from its provision.
After a long, cold period but before fruit trees bloom the following season, remove nests from storage bags or containers and return them to the orchard. Place them in a small box with a hole oriented so that bees can crawl out toward the light rather than being forced to fly out. Make sure plenty of fresh, clean nests are available for newly emerged bees so that they won’t try to reuse the old nests.
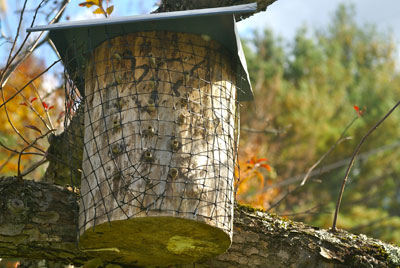
Logs (Figures 3 and 4)
I don’t recommend logs because when I’ve used them, far fewer bees nested in them than in other structures – possibly because my logs were in trees in an open, unprotected area. Using logs is very easy, however, and some bees will nest in them.
The method is the same as for twigs except that nests are made by drilling 6-inch-deep holes with a long, 5/16-inch drill bit into reasonably dry logs, perpendicular to the grain. The bigger the log, the more holes you can drill.
To keep the log dry, screw galvanized tin or old roofing metal on the top. Caulk any deep cracks to prevent parasites from accessing nesting tunnels.
Attach a wire or rope to the log and hang it so that the nesting holes slope slightly downward and stay dry during rains.
After the nesting season, follow the same procedure as for twigs. I have tried to use paper liners with logs, but they are difficult to remove at the end of the season.
Managed Shelters
Managed shelters can be cleaned and used again or kept clean with nest liners. Some sophisticated structures enable loose bee cocoons to be inspected for parasites and disease.
Nesting tubes may be lined with paper tubes so that cocoons can be removed from the main nest and stored compactly under ideal conditions, as in a refrigerator. Pre-slit or easily opened straws (easy-tear systems, Resource 16) enable inspecting or removing cocoons with minimal disturbance. The easy-tear system also has a small hole in the bottom, so if you see light shining through, you know the tube is empty and can be reused next year or discarded.
 |
| Fig. 5. Fedco’s BOB house. |
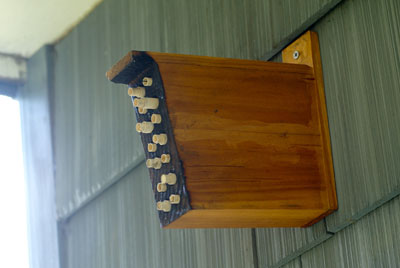 |
| Fig. 6. A solid block nest mounted on the side of a garage, under an overhang. |
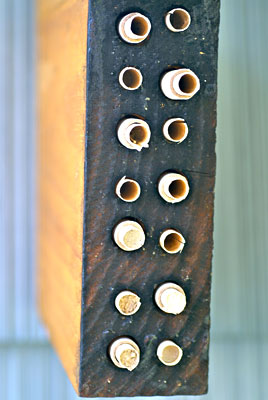 |
| Fig. 7. A solid block nest with five tubes filled. Note that half the cavities (the larger ones) have guard tubes with paper straws inserted. The other half have just straws. |
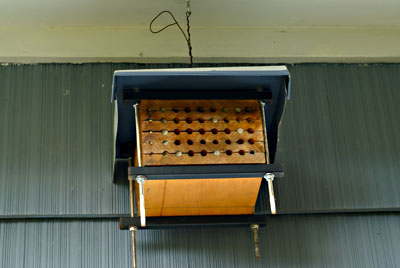 |
| Fig. 8. A bee condo hanging under an eave. |
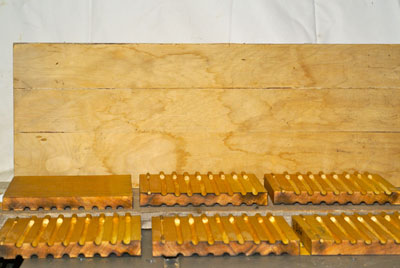 |
| Fig. 9. Pages of a bee condo after saw kerfs have been drilled out, dowels have been glued in to seal the ends of tubes, and the pages have been varnished. |
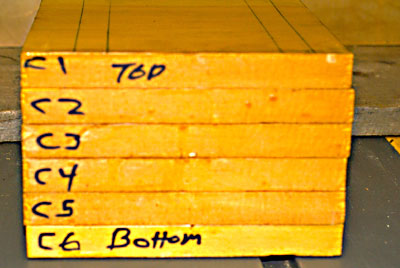 |
| Fig. 10. Stacked and labeled pages. |
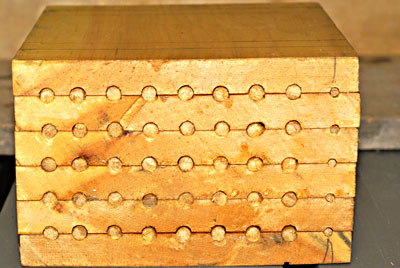 |
| Fig. 11. Stacked pages closed with dowel pieces on one end. |
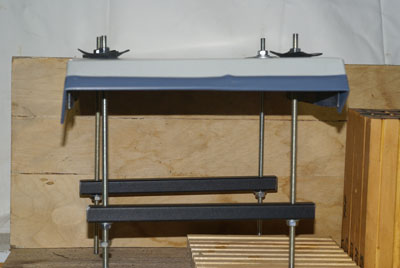 |
| Fig. 12. Clamping system for a bee condo. |
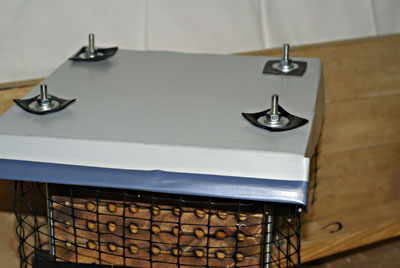 |
| Fig. 13. The roof of the condo. |
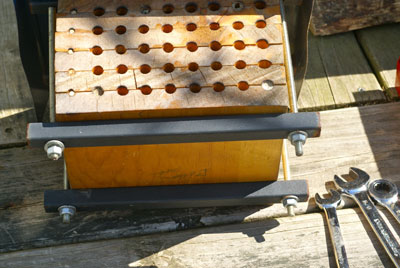 |
| Fig. 14. The base of a condo, where the frame can be tightened as wood dries. |
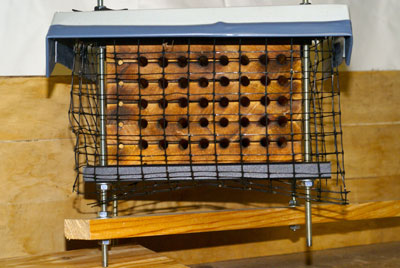 |
| Fig. 15. A completed condo. |
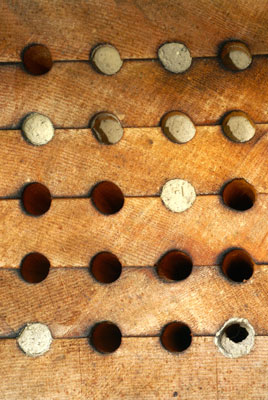 |
| Fig. 16. Some filled nests in a condo. |
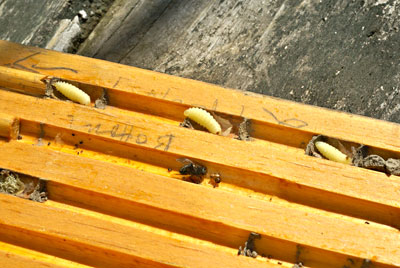 |
| Fig. 17. Pupae in nesting cavities. |
Most commercial straws have no bottom. Homemade straws have no bottom and are easy to unravel.
Guard tubes are heavy-duty straws with a bottom that cannot be penetrated by the ovipositor of wasp predators. Paper liners just fit into guard tubes; if kept out of the weather, this combination can be used as a nesting solution in the same way that twig nests are used. Insert straws in guard tubes, bundle them together with wire or zip ties, insert the bundle in a weatherproof container, such as a tin can or plastic milk container (with one end removed), and hang the container in a sheltered location. (Guard tubes will
delaminate if allowed to get wet.)
Guard tubes require drilling a slightly larger, 7/16-inch hole so that after the tube and liner are inserted, the cavity is still close to 5/16-inch.
Solid Block Nests (Figures 5, 6 and 7)
I think the best system for beginners, documented in Resource 19, is just a solid block of wood and homemade paper straws, although drilling straight, smooth holes about 6 inches deep is difficult without a drill press. Many drill presses cannot drill a hole that deep, so the drill press is used just to start straight holes, and then a long “installer” drill bit (about $12 from a good hardware store) with a portable electric drill is used to finish the holes.
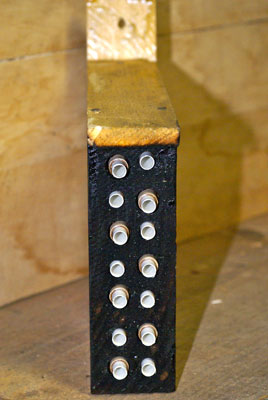
Fedco sells another simple, finished block shelter, described in Resource 4. Half the holes are drilled to 5/16 inch and half to 7/16 inch. The larger hole is for a larger species of bees but used with a guard tube and paper liner gives a finished cavity of 5/16 inch, and the guard tube and liner can be easily removed.
The Page System or Bee Condos (Figures 8-17)
This elegant nest enables thorough bee management with or without paper straws but involves a bit more skill and a few more tools. When done (Figure 11), the nest resembles a solid block of wood with holes drilled into it. However, the block is made of separate “pages” of 3/4-inch-thick wood.
The top and bottom pages have grooves on one side; the others have grooves on both sides. When stacked, pages form a solid block with a matrix of 5/16-inch holes 3/4 inches apart. You can stack as many boards as you want to make large bee “condos.”
You’ll need a table saw, electric cutoff saw, portable electric drill and bits, three long “installer” drill bits 8 to 12 inches long in three sizes: 3/16-, 1/4- and 5/16-inch; a hacksaw and (optional) a 1/4-inch coarse die to cut threads.
Materials include plain softwood lumber (not cedar or pressure-treated), 3/4-inch thick and at least 7 inches wide, heavy metal strapping, square pipe or angle iron, 1/4-inch threaded rod with washers and nuts to fit, 5/16-inch dowels and scrap sheet metal (galvanized or painted roofing metal).
The method below describes making condos first without a drill press and then with a drill press, which greatly simplifies the process. If you don’t have a table saw, get someone to do that sawing for you; it is simple and quick. A table or hand router can accomplish the same task as described below in one step if the correct size and shape router bit is available to make a groove that is one half of a 5/16-inch hole.
Making Bee Condos
Completed pages are shown in Figure 9.
If you don’t have a drill press, cut rectangular slots for nest cavities with a table saw and then, after pages are secured together into a block, round out the cavities with increasingly wider-diameter drill bits.
Set the height of the table saw blade to cut a channel (kerf) about 1/8-inch deep. Run the board through so that the first cut is at least 3/4 inch from and parallel to one edge. Flip the board over end-to-end and do the other side so that the two kerfs are just opposite each other.
To make the top and bottom pages – those with kerfs on only one side – run a shorter piece of 3/4- x 7-inch lumber through the saw as above, but making kerfs on only one side. Make sure kerfs line up properly between the top and bottom pages and their interior mates.
Reset the fence for a second cut at least 3/4 inch from the first kerf and do both sides of the long board and one side of the short board. Repeat this process until you have worked your way across the boards; stop when you get within 3/4 inch from the far side. The board will now have a series of parallel cuts the length of the board – on both sides of the long board and one side of the short board. Kerfs on opposite sides must align exactly with each other.
Next make each kerf a little wider by repeating the above process with the saw fence set over the thickness of the blade so that the resulting kerf is twice as large as the original cut.
Now using a portable electric or hand saw, cut this board across the grain, perpendicular to the long kerf cuts, into equal pieces. The pieces must be at least 7 inches long but need not be exactly the same length – but they should be square.
These kerf cuts make channels for a long installer bit to follow without wandering. I tried to drill the holes without this prior table saw process and the bit wandered so much that the pages were unusable.
Stack these pieces, making a block roughly 7 by 7 inches, and clamp the block together with two woodworker’s clamps. Label which page is top and which is bottom and the order in which they stack (Figure 10). Put the stack on a piece of scrap wood and round the rectangular slots made by the table saw with a 3/16-inch drill, but drill only halfway through the block. You should have a hole every 3/4 inch, with the first and last holes 3/4 inches in from the side edges.
After drilling one side, flip the block over and drill the other side to complete the nest cavities. Don’t let the drill wander. If you aren’t sure about this, open the block and inspect it.
Repeat this process with a 1/4-inch drill and finally with a 5/16-inch drill, going slowly. Vacuum the shavings as you drill, for good visibility. If you wish to use guard tubes, make the hole 7/16 inch; to use paper liners without guard tubes, the nest cavity should be close enough to 5/16 inch to work well.
A drill press simplifies this process greatly, skipping the saw kerf part and just cutting blocks of wood 7 inches long, stacking and clamping them, and then drilling 6-inch-long holes in one step with a 5/16-inch bit. If your drill press can’t drill 6 inches, just drill as far as it will go and then, using these as guide holes, finish drilling with a longer bit on a portable electric drill. If you use this method, you don’t have to drill clear through and can omit plugging cavities with dowels (below).
Open and inspect the blocks. If all looks good, wrap coarse sandpaper around a 5/16-inch dowel and lightly sand the grooves smooth.
Lay the blocks on a table. Cut 5/16-inch-diameter dowel pieces 1/2-inch long. Apply glue in the groove and then lay one dowel piece into the glue at one end of each groove on the top side of all grooved boards EXCEPT the top page. Wipe off excess glue. Reassemble the pages in the correct order, clamp the block with two clamps and let the glue dry.
When the glue is set, remove clamps and pry the pieces apart. Unless you were reckless with the glue, they should come right apart.
Coat all surfaces including nest grooves with one coat of polyurethane, doing one side, letting it dry, and then doing the other side. When the urethane is dry, reassemble the pages, clamp them together and coat the outside edges – sparingly on edges with open tube ends to avoid a big mess. This finish keeps the wood from sucking moisture from provisions in the nest chambers. If the provision dries, bee larvae will not mature successfully.
When assembled, scorch the front surface where the holes are with a propane torch to make an irregular pattern in the wood. This helps female bees locate their home nest.
To ensure a light-tight, parasite-proof seal between pages of the condo, clamp the pages together with a reasonable amount of force (Figures 12-15). Rubber inner tube straps or nylon straps might work, but most commercial nests use four metal straps and threaded rods and nuts to seal the pages. This method also allows pressure to be applied to close cracks as the wood dries and weathers.
Use the thoroughly dry, reassembled blocks to measure where to cut and drill metal strapping. I used square tubing, free from my transfer station. If you purchase strapping, try predrilled angle iron. It is very expensive, so try to make do with scrap metal.
Cut the threaded rod so that you have plenty to hold the roof on. Place rods on the outside of the nest or, if you allow sufficient room, through the interior of the nest. Always make oversize holes for the rod to pass through so that it doesn’t hang up when inserted.
Put two straps on top and two on the bottom and connect with four threaded rods. Hold the whole thing together with washers and nuts.
Drill four oversize holes in the roof metal so that the roof slides down easily on the rod. Bolt down the roof. I used old inner-tube washers and large metal washers to make a watertight seal around the rod.
You can figure out how to attach the condo to your site. Extra rod at the bottom allows you to bolt the condo to a piece of scrap lumber nailed to a building or post. Remember to place the condo for morning sun exposure. The sooner the bees get warm, the sooner they get to work. To avoid dislodging the egg in the cavity from its provision, secure the nest against buffeting by wind.
After the season, loosen the clamps and separate one page at a time. You will see pupae in occupied cavities with mud walls between each pupa (Figure 17). You can inspect and destroy undesirable occupants, clean remaining pupae and store them in an aerated plastic container in the refrigerator until spring. Research the techniques used for release and check Resources 3 and 16 for good photos of undesirable nest contents.
Resources
1. Good place to start, with videos and how-to info. www.davesbees.com/masonbees.html
2. Good instructions on building a nesting block. www.davesbees.com/buildblock.html
3. Karen Strickler, Pollinator Paradise, 31140 Circle Dr., Parma ID 83660; 208-722-7808. Dr. Strickler is an extremely knowledgeable entomologist with extensive education in pollination ecology. She says she is trying to improve her website. www.pollinatorparadise.com/
4. UMaine fact sheets on native bees, with instructions for simple nests (same one Fedco sells). https://umaine.edu/blueberries/factsheets/bees/301-field-conservation-management-of-native-leafcutting-and-mason-osmia-bees/
5. USDA directions for nesting block with paper inserts. www.ars.usda.gov/Services/docs.htm?docid=10743
6. Making reed or stick nests. www.ars.usda.gov/Services/docs.htm?docid=19236 www.ars.usda.gov/Services/docs.htm?docid=14404
7. Google “Randy Person” for info from an experienced guy. His take on a modular bee condo is at https://snohomish.wsu.edu/mg/ombblock/ombblock.htm and he shows how to make paper tubes from parchment paper at www.authorstream.com/Presentation/Penelope-39538-paper-liners-work-Home-Mason-Bee-th-Education-ppt-powerpoint/
8. Deep resources for pollinator conservation at www.xerces.org/ and a PDF on managing tunnel nests for optimum results at
www.xerces.org/wp-content/uploads/2009/11/tunnel-nest-management-xerces-society.pdf
9. Good links and useful info from Washington State University. https://gardening.wsu.edu/library/inse006/inse006.htm
10. The mother lode. A free, long PDF from SARE with everything you need to know.
www.sare.org/Learning-Center/Books/How-to-Manage-the-Blue-Orchard-Bee
11. General info. www.homeorchardsociety.org/article/15/
12. General info with specifics on what to do during the year. indytilth.org/Links/MasonBee_info.pdf
13. Free 170-page book on pollinators; special sections on mason bees and other Osmia. www.sare.org/Learning-Center/Books/Managing-Alternative-Pollinators
14. Supplies for the mason bee aficionado, including a good book for beginners (Pollination with Mason Bees: A Gardener and Naturalists’ Guide to Managing Mason Bees for Fruit Production, by Dr. Margriet Dogterom, also available from Amazon for $8.95 or from Pollinator’s Paradise). https://beediverse.com/
15. A 28-page publication from ATTRA (National Sustainable Agriculture Information Service) for $4.95. https://attra.ncat.org/attra-pub/summaries/summary.php?pub=75
16. This Washington state supplier enables a successful experience with mason bees including automatic e-mail reminders of what to do during the year. Worthwhile and well-made site. One of the few sites with easy-tear paper tubes and guard tubes. www.crownbees.com/. A good page on predators, pests and their control at www.crownbees.com/category/questions/pests-questions/
17. Google “Sherian Wright” for authoritative articles and the book “Mason Bees for the Backyard Gardener.”
18. Complete list of web links for native pollinators. www.beementor.com/native-bee-nest-tubes-and-blocks/
19. A very good place to start, with possibly the BEST combination of simple, cheap and easily maintained nesting blocks using homemade paper liners. You could also use the system with a “page” block to eliminate using dowels to seal cavity bottoms. The paper tubes are simply folded over and held in place with a small board. Remove the board and pull the liners out by their “tails.” www.authorstream.com/Presentation/Penelope-39538-paper-liners-work-Home-Mason-Bee-th-Education-ppt-powerpoint/
