Maine winters are long, but our cool, wet spring season is even longer because of our impatient yearnings for fresh greens, dry paths and more color in the landscape. And as farmers adapt to the rising problem of climate change, it’s important to plan ahead for bulb planting. Spring bulbs are the bright spots, the color-rich buoys of hope in a sea of mud and sloppy snow squalls. ‘Yellow Winter’ aconite and bobbing white snowdrops yield to pastel crocuses and purple dwarf irises. Then comes the show of narcissus and early tulips, reassuring us that it is time to plant peas and lettuce and fava beans, that we have made it, that tree leaves will unfurl, asparagus will go to fern and strawberries will bloom once again. Here’s everything you need to know on planting fall bulbs in Maine.
Defining a bulb
The term “bulb” has come to include a variety of plants with a large, swollen storage root or stem section from which a flowering plant grows each year. Some are true bulbs; others are corms or tubers. In New England and areas where winters are cold enough to freeze the ground, most bulbs are planted in fall, but there are tender summer bulbs that are spring planted and dug in fall for over-wintering in cool storage.
Planning a bulb display is almost as exciting as seeing the mass of bulbs come up. Your artistic vision must factor in bulb height and the time of bloom, light, soil drainage and fertility.
Planning your fall bulb display
You can plan your bulb garden for an ongoing show of color. When you purchase bulbs, the catalog and package will denote whether they are early-, mid- or late-season (spring) bloomers.
Height is another consideration. I like to plant the shorter grape hyacinth amid or in front of the mid-spring narcissus. A low-growing planting needs to be placed where you will be able to see it – next to a walkway or in a raised bed, for example. Taller plantings are easily noticed from farther away.
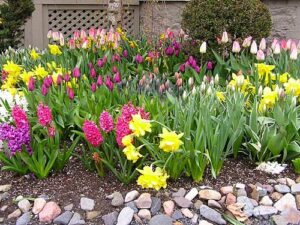
Mass plantings make a greater impression than a few flowers. Aim to plant at least 10 of one type of bulb in a cluster. You can barely notice one or two bulbs. I like to mix 10 or more tulips of a few colors with the same bloom time. Bulb catalogs often carry stunning color mixes, many for a lower price than when you buy the individual bulbs and mix your own. You can also buy a pre-planned collection, such as a low border classic collection, complete with a layout guide.
When buying bulbs, pay attention to sizing and pricing. Less expensive bulbs may be smaller bulbs. Larger bulbs grow larger blooms and, often, multiple stems. Bulb size is indicated by centimeters or the terms “exhibition size,” “top-size” or the smaller “landscape size.” One can buy bulbs online, through a catalog or at a retail garden center. Catalogs offer a very wide selection, while at a garden center, you can feel the bulbs and select firm, large ones.
Climate and soil
Bulbs prefer full sun. Planting early spring bulbs under a deciduous tree works, because the bulbs get light and are able to bloom before the tree fully leafs out. Planting in full sun works better for mid- to late-spring flowers. Southern slopes warm earlier and promote earlier bloom than north-facing ground. A heat sink, such as a foundation, promotes very early blooming. I planted crocuses in a raised bed in front of my sunroom foundation, and those crocuses bloom 10 days before the same bulbs farther out in the yard. So the same bulb varieties can be planted in different areas to extend their display.
Bulbs do not like to “get their feet wet” and will grow poorly or rot in poorly drained soil. Avoid low-lying areas or beds that catch rain and snow melt off the roof. I can’t put narcissus in that sunroom bed because the bed collects too much rainwater coming off the glass. Crocus bulbs tolerate water far better than narcissus.
There are two approaches to planting fall bulbs. One is to prepare an open area; the other is to “naturalize” or plant in individual holes in an existing garden or grassy area.
How to plant your fall bulbs
Timing and mapping out your garden is key to growing a beautiful display.
When to plant
You have to plan for such salvation. Plant bulbs in mid- to late fall. October is the ideal time, with soil temperatures in the 40- to 50-degree range, but bulbs can be planted as long as the ground is not frozen, well into November. Four to six weeks is optimal for bulbs to set roots and establish themselves before going dormant until spring.
Ways to plant your bulbs and fertilizeer
To naturalize, place bulbs in the desired pattern, then use a trowel or bulb planter to dig each hole (a long-handled bulb planter is useful here), place 2 teaspoons of bulb fertilizer or bone meal and wood ashes in the hole, drop in the bulb pointy side up and cover.
To plant in a garden, turn the soil deeply. If you have soil with heavy clay, add compost, peat moss or well-rotted cow manure to the top 12 inches of the soil and amend the soil, if necessary, to approach the optimal pH for bulbs of 6 to 7. Pull all the soil away to the correct bulb planting depth, sprinkle bulb fertilizer or bone meal and wood ashes or some form of phosphorus and potassium, which bulbs need for good root growth. Place the bulbs at the specified planting distance and then cover them with soil.
Bulbs are planted at a depth of two to three times the height of the bulb: tulips 6 to 8 inches deep; smaller bulbs, 4 to 6 inches. (See the planting chart at https://www.fedcoseeds.com/bulbs/bulb_chart.htm)
Skunks and dogs love to dig up bulbs to get to the bone meal planted beneath them. If these animals visit your yard, consider using a bulb fertilizer that does not contain bone meal. Blood meal may help deter many critters, and dusting plantings with black pepper and ground cloves after planting will prevent most critters from smelling the bone meal. Repeat again in spring.
An alternative to bone meal that is also organic is a mixture of soybean or alfalfa meal, rock phosphate, K-mag (langbeinite), greensand and kelp meal.
Mulching
Cover the plant with 2 to 3 inches of loose mulch, such as shredded bark mulch, shredded leaves or other loose material. Mulch regulates the soil temperature through the winter and prevents heaving and false starts. It also helps maintain a consistent soil moisture level. Avoid mulching small bulbs too heavily as they may have difficulty pushing up through a thick, dense mulch. Thicker mulch can be applied to any bulbs for extra winter protection and then removed in spring so that soil can warm.
In spring, for optimal growth, pull back mulch and dress the bed with compost. Mulch may be re-applied for continued weed prevention and moisture regulation.
Long-term care for fall bulbs
If your tulips begin to produce weak plants and no flower, they may be overcrowded, under-nourished or lack sufficient light. Always pinch faded bulbs to avoid seed production, especially on tulips. This forces the energy back into the bulb and prevents it from weakening. Bulbs may need to be strengthened with feedings of compost and bulb fertilizer. If they are crowded, they will need to be dug and divided.
Fall bulbs
Fall bulbs are perennials. Many live for decades. Some will divide and produce larger clumps. Catalog descriptions usually indicate those that divide readily or naturalize. Some need to be dug and divided or separated every few years. To do this, dig the clump with a garden fork or shovel, then break apart the bulbs and re-plant them at the appropriate spacing in compost-rich ground.
Summer bulbs
Summer bulbs, such as some begonias, dahlias (tubers), ranunculus and gladiolas, tend to be less hardy. In Maine, treat them as tender annuals. Plant them when soils warm and danger of frost has passed. If you want a jump on the season and a longer bloom period, start them inside in pots, then transplant them gently once soil is warm outside. They need compost-rich soil and bulb fertilizer as well.
Dig Summer bulbs in the fall before the ground begins to freeze. After digging, spread them to dry in a shady, dry area. Once dry, pack them in dry wood chips, peat moss, sand, perlite or place them in a mesh bag. Store them in a cool (50 to 65 F), dry, low humidity place until next spring. Never store bulbs or tubers where fruits are off-gassing ethylene (a naturally produced gas give off by apples and other crops in storage). Divide bulbs as needed the next spring, just before planting.
With very little effort, you can reap the reward for years to come from a well planned bulb display. The continual progression of color buoys the heart and brightens the landscape.
Now that you know how to plant bulbs in the fall, maybe it’s time to move on to growing winter crops in Maine!
Roberta Bailey works for Fedco Seeds and farms at her home in Vassalboro. She has written her Harvest Kitchen column for The MOF&G for more than two decades.