By Caleb Goossen, Ph.D.
In my role at MOFGA, I frequently give talks and provide advice to farmers and gardeners regarding organic management of plant diseases. As any attendee can probably attest to, I often pack as much information into the talk as I possibly can. I sometimes fear that making space for the specifics of individual diseases leads me to rush through or gloss over some general recommendations. I could be giving short shrift to simple, but very important, aspects of disease management, and I hope to rectify that here.
One of the vague suggestions I often default to providing is “improve airflow” or, when I manage to be a touch more in the game, I advise to “promote rapid drying.” Either way, these short phrases are doing a lot of heavy lifting for a couple reasons. The first reason is that available moisture on a plant surface is often the primary limiting factor that determines whether a fungal spore can successfully infect a plant or not.
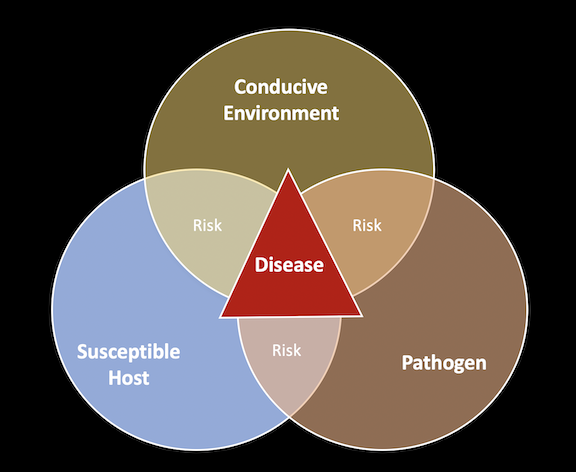
An important concept in plant pathology is the “disease triangle,” which helps to illustrate that disease can only occur when three factors – a susceptible host, a pathogen and a conducive environment favorable to the disease – are all present at the same place and at the same time. We typically have limited control over whether the crops we grow are susceptible or not (however, for this reason it’s always worth trialing disease-resistant varieties, even if you have old favorites that you are used to growing). And we usually have little to no control over the presence or absence of disease organisms in our growing spaces (though do sign up for MOFGA’s Pest Report to be notified when overwintering diseases are active and when non-overwintering diseases are present in our region). That leaves us with influencing the environment immediately around our crop plants as the primary way to prevent disease.

The disease triangle. Courtesy of Caleb Goossen
Though some diseases, like powdery mildews, only require high humidity, a large number require some period of leaf wetness in order to survive long enough to grow and infect a host plant. This is why promoting rapid drying conditions in the garden is such a powerful way to modify the environment around a plant and helps to minimize disease.
Importantly, the phrase “promote rapid drying” also represents a whole suite of actions and management decisions, especially when tailoring them to your specific situation. Of these many aspects, one I get asked about frequently is watering. While it’s best to keep foliage dry and to target water to the soil below plants, most home gardeners, and even many farmers, are limited to overhead watering from sprinklers or when watering by hand. We still have some control to help minimize the length of time our plants stay wet, however, by changing what time of day we water. On behalf of water efficiency, it’s typically recommended to avoid watering at mid-day (when much of the water that is sprinkled on evaporates). Though plants won’t dry off as quickly as they would at high noon, it’s typically suggested to water in the morning or the evening/late afternoon. I recommend that any afternoon watering get done early enough that plants can dry off for a couple hours before nightfall when they’re likely to receive dewfall, as you want to reduce consecutive hours of leaf wetness as much as possible. My preferred strategy for getting the best of both worlds is to water very early in the morning, around sunrise typically. Plants are often already wet from dew, so watering shouldn’t drastically change the time they would typically dry off anyway. Another plus is that there’s at least a small chance that your overhead watering will wash fungal spores off of leaf surfaces. A relatively inexpensive irrigation timer on your hose bib can help non-morning-people get their sprinklers going as the sun is rising.
The other vague phrase “improve airflow” also carries a lot of weight in terms of what it can suggest. So-called “proper” plant spacing and thinning is an issue that I know many of us struggle with. It’s tempting to pack as many plants into our limited growing spaces as we can. However, you may want to keep your plant spacing at the larger end of the recommended range for the varieties that you’re growing if plant diseases have been a challenge for you in the past. Experienced growers may be able to space their transplants or thin their seedlings by eye, but it is something that new growers can find particularly challenging, as they may not yet have developed an intrinsic sense of how large the plants they’re growing will get. There’s no shame in gardening with a yardstick or a long measuring tape by your side, which could help you keep straight rows, too!

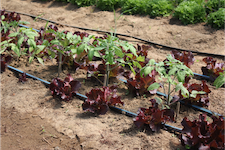
An interplanting of a long-season crop, tomatoes, with a short-season crop, lettuce. The lettuce will be harvested leaving space for air flow. Caleb Goossen photo
A few strategies that I sometimes employ in the garden for balancing airflow around each plant, while getting as many plants in as I can fit, are:
- Planting in zig-zagging rows instead of straight rows.
- Trellising appropriate crops (cucumbers, vining squash, tomatoes, etc.) – not only does this reduce the plant’s “footprint” when it would otherwise sprawl, but airflow is almost always greater the higher you move from the surface of the ground.
- Growing in raised beds – for the same reason as trellising, the extra elevation can get plants up where air moves just a touch more freely.
- Harvesting appropriate crops in a “thinning” manner – by taking one or a few plants in staggered spacing throughout a row, instead of harvesting from one end of the row to the other, you can open up gaps for greater airflow between the plants you leave behind.
- Prune off the lower/older leaves on appropriate crops to facilitate airflow (and to remove potential sources of disease inoculum, as older leaves tend to be more susceptible to infection as they age and senesce and then may serve as a jumping off point for more disease spore production).

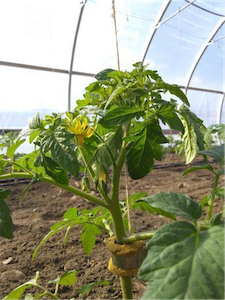
The main stem of this tomato plant is pictured growing upwards at the plant’s right, while a “sucker” is growing from a leaf axil below the first flower cluster. Photo courtesy of Rosalie Oceanna
Tomatoes and cannabis are crops that are commonly “pruned up” in commercial production, meaning their older leaves are removed as the plants get taller in order to keep air moving freely through them. I find it can also be worth doing to brassicas (e.g., kale, cabbage, Brussels sprouts) and summer squash in the home garden. Tomato pruning also typically involves “suckering” – the removal of side shoots from the leaf axil (where the leaf meets the stem) that would otherwise grow to become whole new stems with their own leaves and fruit. Tomato suckering choices vary between varieties grown, plant spacing chosen and other grower preferences, but the bare minimum that I typically recommend is to remove all suckers from the base of the plant until just below the first flower/fruit cluster, where a particularly strong-growing sucker usually forms, often before any of the others. I prefer to let this one sucker grow as a “second leader” for the plant, but greenhouse growers often maintain only one primary leader. I often stop there for determinate (bush) tomato varieties, but will continue suckering as the plant grows taller with indeterminate (vining) varieties. I usually let most or all of the suckers grow on a cherry tomato plant and simply give it space to go a bit wild. New growers should take great care to learn to confidently distinguish between a sucker and a tomato’s compound leaf, which can look deceptively similar.
One last tip for first-time growers, or those wanting to rearrange their existing garden setup, is to orient your garden beds in-line with the prevailing winds in your area – which can further promote rapid-drying conditions. For most of us, that is probably west/east, but local land uses and topography can change that.
Caleb Goossen, Ph.D., is MOFGA’s organic crop and conservation specialist. You can contact him at [email protected].
