 |
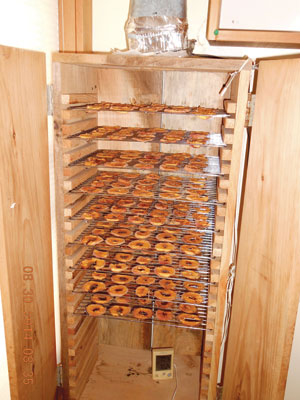
| Warm air from an attic is blown through this cabinet to dry produce. |
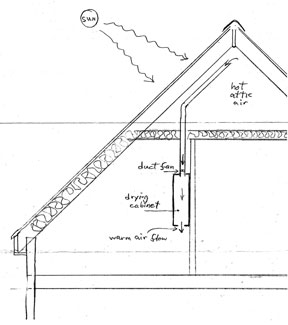 |
| The drying cabinet setup. |
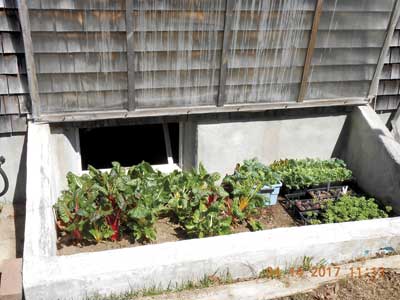 |
| Warm air from the basement keeps plants in the coldframe from freezing. |
 |
| A small, well insulated box in the garage stores root crops. |
By Eric Evans
My wife, Laura, and I love to eat the fruit and veggies that we grow organically on our solar-powered homestead in Camden, Maine. We also like to make our own low-tech and low-energy innovations for growing and storing our harvest. Here are three ideas that you might find useful.
“Solar” Fruit Drier
Peaches are one of our favorite and most reliable crops. We started with one Reliance tree 20 years ago. With careful pruning, manually removing leaves showing any sign of peach leaf curl, and thinning the fruit twice during the summer, our harvest from this one tree reached a maximum of 7 bushels a few years ago. Most years we get 3 to 5 bushels. Now we have five peach trees of different varieties and the prospect of our annual harvest swelling to 10 to 20 bushels. What will we do with all those peaches?
We love dried fruit – concentrated essence of summer flavor in a zero-storage-energy chewy treat. Can we make a solar-powered fruit dryer large enough to dry bushels of peaches in late summer?
It occurred to me that our house has an enormous supply of hot, dry air whenever the sun shines in the summer – in our attic. So I made a cabinet to hold 25 standard 10-by-14-inch cooling racks, mounted it on the wall in my upstairs office, and arranged a 4-inch duct and a small fan (100 cfm, 15 watts, from Grainger) to suck air from the peak of the attic and blow it down through the cabinet full of sliced peaches. The inside dimensions are 10 1/2-by-14 1/2 inches for the racks. The vertical dimension of mine is 35 inches, but it could be much shorter. The doors should close snugly enough so that all of the airflow exits through the 4-by-4-inch hole in the cabinet floor.
We slice 40 ripe-but-still-firm peaches into three-eighth-inch slabs in the morning while the attic is warming up, arrange these on the racks and load them into the dryer cabinet by late morning. Bathed in 115 F flowing air, the peach slices are nearly dry when the attic cools off in the evening. I turn off the fan for the night, then finish the drying in the second afternoon. The end product is soft and chewy like the commercial product, and dry enough to keep indefinitely at room temperature in plastic zipper bags.
It’s best to cut slices of uniform thickness and exclude the end slices so that they all dry at the same rate. This is easy with Reliance peaches, which are free-stone (i.e., the pits are easy to remove from the flesh). I wouldn’t try it with cling peaches. We cut around the equator of the peach, through to the pit. The two halves can then be pried apart gently, the pit flipped out, then each hemisphere sliced into three-eighth-inch slabs. It’s very hard to cut a ripe peach into quarter-inch slabs, but if you succeed, they will dry much faster.
We use the same method to dry August-ripening pears and Williams Pride apples. Apples are easy to slice into uniform quarter-inch disks with our hand-crank spiral-peeler-slicer. These dry in less time than the thicker peach slabs. Sungold tomatoes and hardy kiwis cut in half dry quickly into fruit candy. I tried some black currants, but the waxy skin prevented drying.
Another factor affecting drying time is how full we load the cabinet. With 10 racks of peach slices, the top racks dry faster than the bottom ones, so I rotate top vs. bottom in midafternoon. I think this indicates that 10 racks might be the limit for efficient drying with my attic air. My attic has a volume of 7,000 cubic feet and is passively ventilated with air entering at continuous soffit vents and exiting through the ridge vent. If my “100 cfm” fan is actually moving 50 cfm, that would exchange the entire attic air volume in about two hours. A stronger fan would probably cool the attic faster, but the faster airflow might offset the lower temperature – more or less.
Here’s a fan mounting note: Separate the fan from the duct and cabinet with foam weather-strip to prevent an annoying hum.
As we approach the autumn equinox, the days get shorter and the sun lower, so the attic air is less warm. The result is slower drying, but it still beats hanging the slices on a string over a cook-stove.
Basement-Warmed Coldframe
We also make use of the warm air in our basement – that is, warm relative to the outdoors in winter – to keep a cold-frame from freezing. The 3-by-7-foot coldframe encloses a basement window and has 4-inch-thick foam walls covered with fiber-reinforced stucco. The lid is a double-walled rigid acrylic panel, hinged to the house wall, and weather-stripped with vinyl tube where it rests on the top of the wall. During cold weather we close the lid and prop the cellar window open wide so that air circulates by passive convection between the coldframe and the warm basement. We can also improve this circulation by hanging a used computer-cooling fan (free from computer repair stores, powered by one of the many low-watt output transformers that I save from dead or retired devices) at the top of the open window. Gallon jugs of water placed among the plants slow the overnight chilling. The surplus heat flowing into the cellar from the coldframe on sunny days only partially offsets the chilling of the basement by the cold air flowing in at night because of the much greater duration of the latter. The deficit is not free, being balanced by the cellar woodstove or heat pump.
As the weather warms in spring, the lid is increasingly open (and the cellar window closed) to benefit the plants with fresh air and full sunshine. This change in routine creates a significant risk of quickly solar-cooking the plants if both the lid and the cellar window are closed for more than a minute in the sun, a mistake I have made more than once.
This cellar-warmed coldframe has many uses. We load it with parsley, chard and kale transplanted from the garden in late September. In the spring we remove parsley and chard stumps to make room for seedlings of onions and greens in April, then tomatoes and peppers in May. In summer it is mostly fallow, with the lid open and window closed.
Cold Storage in Garage
Our home has a well insulated, warm cellar, so traditional root-cellar storage is not an option for us. Our two-car garage (built as such, but there is no room for our vehicles) is separate from our house and insulated only at the ceiling (below the heated apartment above) and around the perimeter of the concrete slab. The temperature inside follows the outside temperature, but sluggishly because of the thermal mass of the concrete slab and slight insulation value of the wooden walls. The temperature would swing less if the garage were well-insulated, but I’m not going to do that just to store root crops.
The simple solution is to make a small, well insulated root-storage box inside the garage. We have used a retired chest freezer for this purpose, and expanded our capacity by building a blue-board foam cube big enough for four 5-gallon buckets for storing root crops. We still have a problem in most of January and February, when the weekly average temperature in the garage stays in the 20s, which will eventually freeze the stored roots. The solution for this is to include two to four 1-gallon jugs three-fourths full of water in the box. The water provides thermal mass to slow the temperature fluctuations and will begin to freeze when the temperature in the box dips below 32 F. The magic (really it’s physics) of water freezing keeps the temperature in the insulated box at 30 to 32 F, which is OK for stored root crops. In prolonged frigid weather I check the jugs every day or two, and if they hold significant ice, I replace them with jugs of warm water. This winter I did the jug swap just once for the homemade box and didn’t need to at all for the big chest “freezer” that stored five buckets of roots and three jugs of water. The greater the volume of the insulated box full of roots and/or water jugs, the slower the temperature fluctuations. I also greatly reduce freezing inside the box by opening the garage doors during above-freezing days to flush out the cold. Similarly, I can speed cooling inside the garage in fall by opening the doors at night and closing them during the day. This is a good practice only if you can prevent rodents and other pests from entering – for example with well-fitting screen doors.
My next low-energy project will be to build a larger version of this – an insulated double closet big enough for 10 bushels of roots, 10 bushels of apples and many jugs of water.
About the author: Eric Evans is co-founder and breeding coordinator of the Maine Chapter of The American Chestnut Foundation. He and his wife, Laura, have been gardening in Maine for 45 years.