  |
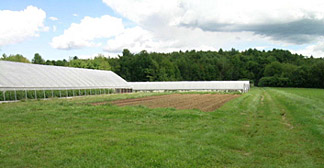
| Hoop houses, such as these shown at the Colsons’ New Leaf Farm, have become increasingly important for producing tomatoes in Maine. Photo by Eric Sideman. |
by Eric Sideman, Ph.D.
MOFGA’s Organic Crops Specialist
The fate of my last tomato of the season is always the same – a BLT. And minutes after finishing that classic sandwich, I start thinking about the first tomato of next season, which, no surprise, will succumb the same fate. I never buy tomatoes from a store, because they taste as if they were picked when they were hard enough to bounce in a box across the country, and then the green fruit was tricked into turning red instead of ripening on the plant (and they were – the term “vine ripened” is allowed with just a blush of color at harvest). Until about 10 years ago, I had to wait until August for that first ripe tomato–some years until the end of August. That makes for a very short BLT season.
Now I pick my first truly vine ripened tomato in June, and I thank Otho Wells, who was (before he retired) the Extension Specialist in New Hampshire, for dispelling my inkling to move to warmer climates. He taught us all how to bring a warmer climate to our tomato plants and still grow them to bear all the nutrition and flavor of garden tomatoes. He introduced hoophouses to New England, calling them “high tunnels,” because that is all they are.
A hoophouse is not a greenhouse. Tomatoes grown in hoophouses are grown in the ground, just as field tomatoes are. Perhaps the plot is more carefully managed and easier to amend, because the space is small and confined, but the planting medium is soil. Greenhouse tomatoes, in contrast, are grown in various kinds of media, with most of their nutrients coming from the solution with which they are watered. The extreme greenhouse tomato comes from hydroponic production, which eliminates all of the biology of soil and simply provides tomato plants that are stuck in a sterile medium with a complete and balanced nutrient solution.
Wells’ hoophouse was a low-input system designed to bring tomatoes to maturity three to four weeks earlier than field tomatoes. The hoophouse was a simple quonset style, metal bow, plastic covered tunnel tall enough to walk in. Over the past decade or so, some producers have added features that ripen tomatoes even earlier but have maintained the basic premise that the tomatoes are grown in the ground. Most commonly, growers have added heat and automatic ventilation, but many maintain the very simple system first suggested. Heat can ripen tomatoes another two to four weeks earlier. Hoophouse production has made a difference in farm profits from tomatoes, because a tomato in June is worth a great deal. Many farms have built more houses after seeing the results. In addition to being earlier, tomatoes from hoophouses tend to be beautiful and blemish free.
Selecting the Site
It is very important that water does not drain into the house. Select a site that is flat under the house and that is well drained, with slopes away from the house. Choose the soil and amend as you would for garden or field production of tomatoes (see MOFGA Fact Sheet #1).
The orientation of the house depends on the time of year of production. If you are aiming for very early- or very late-season production, remember how low in the southern sky the sun is in northern New England. The hoophouse for this production should be oriented with the long axis east-to-west to reduce shadowing caused by the low angle of the sun. For midseason production the orientation is not critical.
In northern New England snow buildup is a concern. Better quality houses can take quite a load because the snow tends to slide off. But problems arise when snow on the side of the house builds up above the hip boards and has no place left to slide. Always space your houses to provide enough room on the sides to get in with equipment and move snow away.
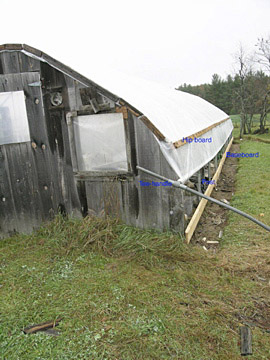 |
| Details of a hoop house include a tee-handle for rolling up the sides for ventilation; and a hip board, baseboard and post. Photo by Eric Sideman. |
The Structure
Hoophouses are sold as metal bows made of galvanized steel pipe. The bows fit into a piece of pipe with a larger diameter that is driven into the ground (see photo). The bows come in quonset style or gothic style; the latter is higher near the sides. The most common hoophouse is 96 feet long with bows 4 feet apart. Many growers build small houses by simply setting fewer bows, but since the plastic cover typically is sold in 100-foot rolls, houses are built in lengths that avoid having odd bits of plastic left. For example, the next most common size house is 48 feet. The width of the house varies from 14 to 30 feet.
Most growers build their own end walls from wood or make a wood frame on the end and cover it with plastic. I suggest you build the house either with a portable end wall or a large door to allow access with a small tractor.
Baseboards (see photo) are attached to the posts. Hip boards (see photo) are attached 4 feet above the ground on the bows.
Greenhouse grade polyethylene covers (I suggest at least a three-year grade) are clamped with a batten board to the hip boards, and the bottoms are rolled onto pipe on each side that can be rolled up by means of a tee-handle (see photo).
Temperature Control
Ideally the night air temperature should not go below 60 degrees F. and the soil should be at least 60 degrees F. when you transplant. This is very difficult in an unheated hoophouse. Generally, growers use unheated houses to protect plants from freezing and put the plants out in early May, but rarely are they able to maintain ideal conditions. Thus, many growers have added heat to their houses to maintain ideal air temperature, and some have added underground heating to warm the soil. By keeping the air at least 60 degrees F. at night, growers find that the soil is warm enough (not ideal, but warm enough) to aim for an April 1 date for setting out the plants.
Roll-up sides, electric fans and ventilation keep the house from getting too hot during the day. Excess heat is especially problematic when plants begin to flower, because it disturbs pollination and may even cause blossom drop. Ideally, the house should not go above 90 degrees F.
Plants and Planting
The date to start transplants depends on your timing and whether you have heat in the house. Transplants should be five to seven weeks old at transplanting time. I have heat in my house and aim for an April 1 planting. I start my transplants early in February, potting them up three times until they spend their last two to three weeks in a 4-inch pot.
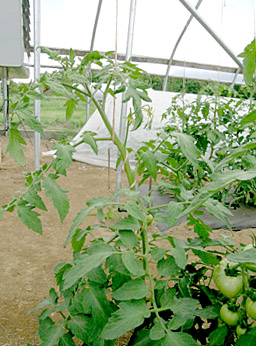 |
| Tomato plants can be supported by string from above. Photo by Eric Sideman. |
Managing the floor of the hoophouse is important, especially if you do not have bottom heat. I lay clear plastic on the floor in late February or early March; this warms the soil better than black plastic. Just before transplanting I take up the clear plastic and lay drip lines for irrigation along the rows and lay black plastic mulch. I cover the whole floor of the house with 4 mil black plastic, but many growers just make typical black plastic covered beds.
Transplanting is best on a cloudy afternoon. Set plants a bit deeper than they were in the pots. The wider the spacing, the greater the air flow, so foliage will stay drier and diseases will be less problematic (see below). The minimum spacing is 18 inches between plants within rows, and 3.5 feet between rows.
Tomato plants are trellised in two ways, usually. The basket weave system (see photo) is used for determinant varieties or indeterminant varieties that are to be topped. Drive wooden stakes soon after transplanting, with two plants between stakes. As the plants grow, run strings from stake to stake, weaving the string in and out around the plants. Repeat as plants get taller, running the string at increasing heights. Remove suckers before they are 3 inches long, up to the sucker that is just below the first flower cluster. For indeterminant varieties prune off the tops of the plants when the blossoms will not develop ripe fruit before the date of your last planned sale.
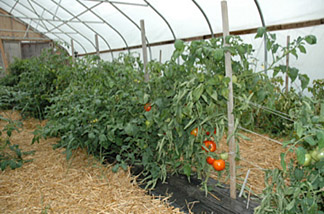 |
| Strings are stretched from post to post and around tomato plants to create a basket weave system of trellising. Photo by Mark Hutton. |
The other common way to trellis is to wrap each plant around a hanging string (see photo). Build a trellis by setting support posts in the ground about 20 feet apart. The tops of the posts should be 6 or more feet above the soil surface. Stretch a heavy wire between the tops of the posts and attach a length of heavy twine to the wire above each plant. Barbed wire prevents twine from slipping as the top wire sags with the weight of the plants. Tie twine to the base of each plant or to a bottom wire, if one is used. As plants grow, wrap them around the twine for support, or use plastic clips that greenhouse tomato growers use. When trellising two stems per plant, use a separate cord for each stem. Prune off all suckers.
Varieties
A recent trial by Mark Hutton, Maine’s Extension vegetable specialist, ranked common varieties grown in hoophouses, considering yield, quality, disease and taste. (Contact Mark or me for a copy of the results.) ‘Jetstar’ ranked highest in the overall combination of categories. Other good varieties were ‘Big Beef’ and ‘Brilliante.’ However, many growers have turned to disease resistant greenhouse varieties, such as ‘Boa,’ ‘Cobra,’ ‘Buffalo’ and ‘Trust,’ as diseases have built up in the hoophouse. (Hutton did his trial in a new hoophouse with very wide spacing and saw little disease.)
Troubleshooting
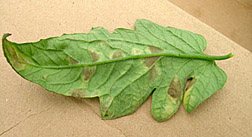 |
| Leaf mold on the bottom of a tomato leaf. Photo by Eric Sideman. |
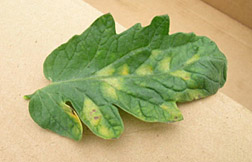 |
| Top view of leaf mold. Photo by Eric Sideman. |
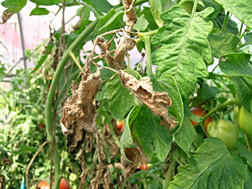 |
| Botrytis on tomato leaves. Photo by Eric Sideman. |
Hoophouse tomatoes have a different set of problems from field tomatoes. For the most part, diseases that take down field tomatoes and ruin the appearance of the fruit, such as anthracnose, early blight, septoria leaf spot, etc., are not common in hoophouse tomatoes. But some diseases are a big issue due to high humidity. Most common are gray mold (see photo) and leaf mold (see photos). Sanitation is important to control leaf mold but does little to control gray mold, because gray mold has a wide host range and spores are blowing everywhere. Good ventilation and reducing the length of time that leaves are wet are key controls for both diseases. Hornworms are often a problem and good scouting is important. Either Bt (Dipel DF) or Spinosad (Entrust) provides excellent control.
Another problem in hoophouses is salt buildup. Since minimal water washes through the soil, salts from all the typical sources of nutrients build up and often reach problematic levels. The best solution is to roll the plastic up to the peak of the house and let the rain wash salts out at the end of the season.
Resources
Griffin Greenhouse & Nursery Supplies, 207-657-5442, www.griffins.com
Ledgewood Farm, 603-476-8829, www.ledgewoodfarm.com
Eric is MOFGA’s organic crops specialist. You can contact him with your questions at [email protected] or 568-4142.
