By Eric Sideman, Ph.D.
Organic farming is centered on taking care of the soil. You do not need soil to produce crops, as hydroponic farms show. But organic farmers hold tightly to the belief that for sustainable crop production, one needs and expects a lot from one’s soil.
Consequently, organic farmers do a lot to care for soil. Organic farmers are expected to manage the soil structure to ensure good water holding capacity and good water drainage; to manage the biological activity in the soil to ensure good cycling of nutrients; and to build the fertility of their soil to maintain or improve its productivity year after year. The soil on an organic farm is much more than a bag of nutrients.
To assess soil structure and biological activity, farmers commonly simply observe the soil tilth, the organisms in the soil, water movement in the soil, crop growth, etc. Some use new soil tests that try to quantify these physical and biological characteristics, such as those of the Cornell Soil Health Testing Service (https://soilhealth.cals.cornell.edu/extension/test.htm). On the other hand, almost all farmers assess the fertility of their soil by soil testing, and most in Maine use the Maine Soil Testing Service at the University of Maine in Orono. The soil sampling kit – a form to complete and a small cardboard box to hold the soil – is available at any Extension office.
Taking the Sample
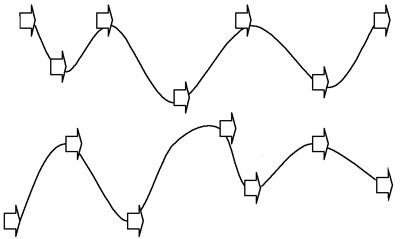
Soil testing is really soil sampling. It is impossible to measure all the nutrients actually in an entire field, but a small sample of your soil can be used to estimate the total. The quality of the estimate depends on the quality of your sample. The lab uses very little soil in its test, so you must ensure that you send a good representation. Collecting a little soil from a single location in a big field, or even in a little garden, will not represent the whole field, because soils can vary greatly from spot to spot. So take samples from about 15 spots in the field, mix them together in a clean plastic bucket, and then take a subsample from that to fill the box to be sent to the lab. Figure 1 shows how to walk a field and choose sites that will represent the field well.
 |
|
Fig. 1. The arrows mark sites for taking samples around a field. The samples are mixed together and a subsample is drawn from that. |
Take a sample that includes the top 8 inches of soil. This is where most crop roots are and where nutrient absorption takes place. I use a soil probe, but anything that does not contaminate the sample will work.
Sample each significantly different field. What is significantly different is up to you and may depend on amendments added over the years, crops grown, soil type in that field and other management or location factors.
Completing the Forms
After you collect the sample and fill the box, complete the paperwork required by the lab. The lab will determine the fertility of your soil and will make recommendations to correct imbalances and build fertility. Based on what the lab finds in its analysis and on the needs of the crop you plan to grow, the lab uses mathematical formulas to calculate its recommendations.
You can make multiple requests for a sample. For example, if you plan to grow strawberries in one half of a field and tomatoes in the other, the lab will provide different recommendations for each. You can also choose a recommendation calculated for mixed vegetables.
You need to complete the information for each sample you submit. Be sure to identify the fields carefully and record your field names.
How Often Should You Sample the Soil?
I recommend that farmers and gardeners sample soil when they first open new ground for production and then that they sample the soil once a year for three years so that they can track improvement. Once you have corrected imbalances and built up good reservoirs of nutrients, testing once every three to five years should be adequate.
When Should the Sample Be Taken?
It is more important that a field be sampled at the same time of year each time it is tested than it is to sample at a particular time of year. Remember, the soil lab is trying to estimate the quantity of nutrients available to plants, not the total amount of nutrients in the soil. Availability of soil nutrients fluctuates with the seasons, temperature, moisture, etc. – especially on organic farms where microbes need to decompose complex molecules to release the simple nutrients used by crops. Generally, nutrients are more concentrated in the fall than in early spring, when the soil has been cold and inactive all winter. But this does not really matter as long as you know when you took the sample. To best compare test results over the years, take each sample at the same time of year.
Understanding the Results
The analysis you receive from the lab will give you a good picture of the nutrients available to your crops. Organic farmers use test results to track their soil husbandry, e.g., to tell how well they are building fertility over the years, in addition to simply seeing if the soil has enough nutrients for optimum yield the next growing season.
The test results provide information about these properties:
• soil pH
• Organic matter
• Phosphorus
• Cation Exchange Capacity
• Potassium
• Calcium
• Magnesium
• Percent Saturation
• Micronutrients
pH
The pH is a measure of the acidity or alkalinity of the soil on a scale from 0 to 14. It is actually a measure of the concentration of hydrogen ions. The lower the number, the more acidic the soil, with 7.0 being neutral. Soils in the Northeast naturally tend to be acidic, with a common pH of 4.0 to 5.0. The pH of the soil is important because most crops grow best at a pH between 6.0 and 6.5. At lower or higher pH levels, nutrients are less available, so symptoms of low pH often resemble a nutrient deficiency. Limestone is commonly added to soil to raise the pH. Wood ash works well, too.
Organic Matter
In the organic grower’s mind, organic matter is the most important constituent of soil. It makes up only about 5 percent of the soil (5 to 8 percent is a good level to aim for; with less than 5 percent, you do not get many benefits; and more than 10 percent creates the potential for too many nutrients being released and causing pollution). Organic matter serves the major functions of providing a nutrient reservoir, holding nutrients, holding water, building soil structure, and feeding the biological activity of the soil. A stable reserve of organic matter is built by adding compost, crop debris, livestock manure, etc. Fresh organic matter that serves as a food for microbes is added by growing green manure cover crops, adding livestock manure, adding crop debris and leaving crop residue.
Phosphorus
Phosphorus is reported on the soil test results in pounds per acre, with 20 to 40 pounds per acre being a good goal. Rock phosphate and bone char are my two favorite sources of phosphorus. See the June-August 2011 issue of The MOF&G for an in-depth article about phosphorus.
Cation Exchange Capacity (CEC)
The CEC is a rather complicated measure of the soil’s ability to hold positively charged nutrients, such as potassium, magnesium, calcium and others. I have seen soils with the CEC ranging from 2 to 12 milliequivalents per 100 grams of soil. It should be greater than 5 in agricultural soils, and it is a waste of time and money to try to get it higher than 10.
Cation exchange capacity is measured in the lab during the soil test, and the proportion of the cation exchange sites occupied by the different cations is determined as well. Many people believe that this proportion is very important, especially for the macronutrients potassium, calcium and magnesium. The University of Maine Soil Testing Service recommends that 3.5 to 5 percent of the cation exchange sites be occupied by potassium, 10 to 20 percent by magnesium, 60 to 80 percent by calcium, and less than 10 percent by non-nutritive cations such as hydrogen (see pH above). If your CEC is in the appropriate range, and if the macronutrients fall within these proportions, you will have enough of these macronutrients in your soil to produce a good yield.
Potassium
Potassium is a very soluble nutrient and can be lost easily from low CEC soils, especially if no crop is actively growing to absorb the potassium. Keep this in mind when deciding when to apply potassium amendments. Potassium sources used by organic growers commonly come in compounds with other nutrients, such as Sul-Po-Mag (used when your soil also needs sulfur and magnesium), wood ash (used when you also need to adjust the soil pH), and alfalfa meal (used when you can afford it and need the nitrogen, too). If all you need to add is potassium, then I recommend potassium sulfate. See the September-November 2011 issue of The MOF&G for an in-depth article about potassium.
Magnesium and Calcium
Growers usually attain adequate levels of these two nutrients by adjusting the pH with dolomitic limestone (high magnesium limestone). If you need calcium without the pH adjustment, then use gypsum (calcium sulfate). If you need magnesium without the pH adjustment, then Epsom salt (magnesium sulfate) is recommended. And if you need to raise the pH but already have high magnesium, then use calcitic limestone or wood ash.
Micronutrients
I believe that micronutrients rarely limit crop growth and yield on organic farms. Good organic farmers add a wide array of different kinds of organic matter, such as livestock manures, crop debris, etc., and these usually maintain adequate levels of micronutrients. If a good organic grower is having a production problem, the last place I would look would be micronutrients.
Nitrogen
Nitrogen is not part of the soil test report. Moisture level, temperature and other environment factors make nitrogen levels fluctuate too much and too quickly to measure this nutrient in a box of soil sent to a lab. Your soil test results will report a nitrogen recommendation, but this is simply taken from a table of crop needs. You need to adjust this recommendation based on information that only you, the soil manager, know. You need to consider how much organic matter you have, how much nitrogen is left to be released from previous applications of nitrogen fertilizers, how much manure or compost has been applied recently, etc. For a detailed discussion, see the fact sheet on nitrogen listed below.
For a more thorough discussion of managing soil fertility (and other aspects of soil husbandry), see these references:
Building Soils for Better Crops, by Fred Magdoff and Harold Van Es, 2009; https://www.sare.org/Learning-Center/Books/Building-Soils-for-Better-Crops-3rd-Edition (online version free)
“An Organic Farmer’s Guide to the Interpretation of a Standard Soil Test from UMO,” by Eric Sideman, Ph.D., and Dave Colson; https://www.mofga.org/Publications/FactSheets/tabid/133/Default.aspx
“Natural Sources of Plant Nutrients,” by Eric Sideman, Ph.D.;
https://www.mofga.org/Publications/FactSheets/tabid/133/Default.aspx
“Providing Nitrogen to Organic Crops,” by Eric Sideman, Ph.D.;
https://www.mofga.org/Publications/FactSheets/tabid/133/Default.aspx
Eric Sideman is MOFGA’s organic crop specialist. You can contact him with your questions at [email protected] or 568-4142.
Soil Test Q&A at Trades Show
At MOFGA Day (January 10, 2012) at the Maine Agricultural Trades Show in Augusta, Eric Sideman and Dave Colson, MOFGA’s director of technical services, will host a question and answer session on soil testing. After a brief introduction, they will field questions about results you received from the Maine Soil Testing Service at UMO. Bring your test results and your questions about how to decide which soil amendment to use, or how much, or when.