 |
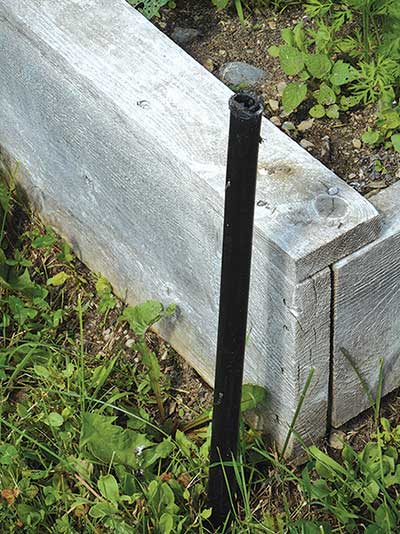
| Photo 1 – Each frame was fitted over a 2-foot-long, half-inch re-rod driven into the ground. Re-rods were covered with half-inch plastic pipe for added rigidity. Longer re-rods would be an improvement, and 3-foot 4-inch sections of half-inch conduit might be even better. |
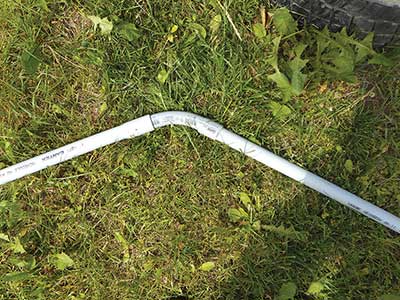 |
| Photo 2 – Frames were assembled on the ground, left and right sides were bolted together, then the entire frame was lifted and dropped over the re-rod anchors. |
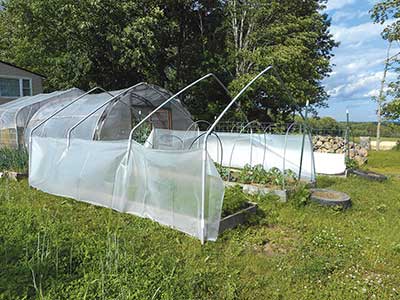 |
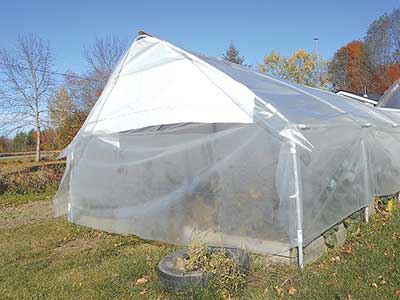
| Photo 3 – Frames erected and poly attached for wind protection. Rails were added later at the top of the sidewalls. |
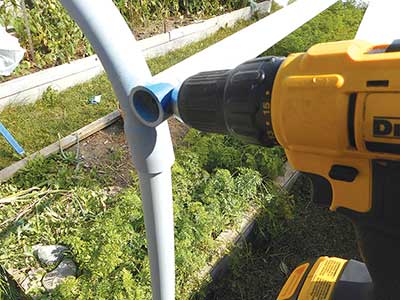 |
| Photo 4 – To ensure future rebuilds with horizontal braces, first drill the brace tubing, then, with two people holding it, drill through the brace holes and the frame. This ensures an easy fit for reassembly. The pipes are color coded for future assembly. |
 |
| Photo 5 – For ends I used poly scraps. I tried row cover, but high winds destroyed it. |
By Ben Hoffman
Photos by the author
My garden area was once the site of a farmhand’s trailer and was landscaped with coarse gravel over a stony loam soil. No matter where or how you dig, you hit rocks, some up to 6 inches long. So I use raised beds filled with a mix of soil, compost and animal manure. They are very productive and have had additions of soil mix each year and several winter covers of vetch or clover.
The problem? Wind. Part of the solution has been half-inch conduit hoops covered with plastic sheeting, but the hoops are not high enough for tomatoes. Several years ago I bought a bargain remnant of 18-foot poly sheeting for my greenhouse – but my greenhouse is 18 feet long and needs sheeting that is at least 18-1/2 feet long. So why not cover my 16-foot raised beds? Photo 3 shows the structure with sidewalls for wind protection, open in summer so that rain will meet water needs and drip irrigation is unnecessary. In mid-September I cover the top and ends with poly sheeting to extend the season.
I considered metal conduit, 2 by 4 framing, you name it, but the easiest solution was 1-inch PVC conduit – easy to cut, easy to glue, inexpensive and easy to cover with sheeting by using snap clamps. After fooling around with dimensions, I settled on a simple frame with 4-foot sidewalls and 6-foot rafters joined by PVC angles of 45 degrees. Three angles make 135, not 180, degrees but close enough that sloping sides and some bending pressure keep frames relatively sag-free, and wide enough (11 1/2 feet) to cover two of my raised beds. (Next time I will add some 12-inch scraps and another angle to the top.)
Each frame consists of two 10-foot pieces of conduit, a coupling and three angle connectors. Each 10-foot conduit is cut with a chop saw or hand saw into a 4-foot and 6-foot length. Each 6-footer has a bell end, and I use couplings on 4-footers that lack a bell end. The structure can’t handle winter snow loads, so I dismantle it in fall, fold the plastic and store everything under cover. The PVC is sun resistant, which probably means it will deteriorate in the sun, and of course poly sheeting will degrade. Winter storage will prolong their life. Painting would add protection to the PVC.
Each frame was made in two pieces for easy take-down. Frame halves are glued together with PVC cement, but top angles are glued only to one side. To secure the ends to the ground, I used 2-foot rebar and slipped half-inch plastic pipe over that (Photo 2). To erect a frame, I dry fit two halves together, lifted the entire frame and slipped one end at a time over the rebar stakes. One person can do this – two work better. After joining the pieces, drill through the joint for a 3/16-inch bolt. (I didn’t and the wind took it down!)
I fasten poly sheeting to the frame using 1-3/8-inch Snap Clamps (available in 10 packs). I was impressed with their ability to hold poly against strong winds. Six-mil greenhouse poly is UV stabilized, stronger than cheap builder’s poly and will last six to seven years. Johnnyseeds.com has snap clamps in 10-packs, and circo/innovations.com has PVC connectors of all types.
After erecting the frame for wind protection, I added two 16-foot PVC tubes bolted to the angle at the top of the sidewall pieces. This adds strength and makes it easy to clamp the sidewall poly and, later, the cover. At the top of the frames, I bolted a 1 by 2 to facilitate pulling poly sheeting over the framework. I bolted this top rail in place with 4-inch carriage bolts through the rail and a 45 connector. An additional 16-foot tube with the poly cover clamped to it could help pull the poly over the frames.
When drilling bolt holes in the frames for longitudinal tubes, drill through the tube, then hold it (two people work best) in place and drill through the holes and the angle pieces. This will ensure that the holes line up for easy bolting. Also, color-code frames and tubes with spray paint so that you can reassemble them in the same order and all bolt holes line up.
For ends I used snap clamps to attach odds and ends of sheeting that I had on hand. The high winds in my location lifted my structure and pulled joints apart, so this year, all joints will be bolted, and I will guy the west side.
Here is the bill of materials (estimated prices) for the frame with side tubes (2017 prices):
| 15 10-foot sections, 1-inch PVC conduit, $4 ea. | $60.00 |
| 12 45-degree couplings, $1.10 ea. | 13.20 |
| 10 short couplings, $0.50 ea. | 5.00 |
| 1 can PVC cement | 5.00 |
| 12 1/4-inch carriage bolts, 3 1/2 inches long, $0.22 ea. | 2.64 |
| 12 1/4-inch wing nuts, $0.61 ea. | 7.32 |
| Total | $93.16 |