Current Situation
There is not enough water in most of our soils, and the temperature has occasionally been very high, and the sun has been occasional very bright. This spells trouble for seedlings being taken from a very cushy life on the bench in a greenhouse and set out in the harsh environment. The two major problems are that the roots are not suited well to carry the often vast amount of top growth, and the leaf tissue has not developed resistance to the UV light, which is mostly blocked by the greenhouse covering. The solution is to harden the plants off by slowly allowing them to adapt before setting them out, and to plant on cloudy days if you can.
In this issue:
Potato Seed Issues
Asparagus Frost Damage
Asparagus Beetles
Flea Beetles
Oedema on Tomato and Related Crops
  |
| Late blight on potato tubers |
 |
| Fusarium dry rot on potatoes. |
  |
| Ring rot on potato |
 |
| Black scurf on potatoes. |
POTATO PLANTING TIME: DON’T PLANT A PROBLEM
Potato seed tubers are often the source of infection for your crop and inspection before planting is well worth the time. Some problem seed pieces are not going to spread a disease and can be planted. Others should never be planted. Here are some common issues.
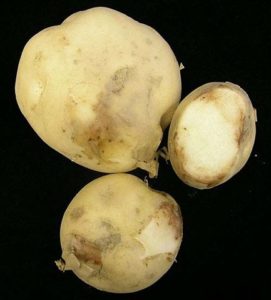
Late Blight – Of course this is the big one. Look at the picture on the web version of this Pest Report if you don’t know what this looks like. Do not plant any potatoes suspected of being infected with late blight.
If you are not sure, check with an expert. Besides taking down your potato crop, planting potato seed carrying late blight is the most likely source of a community or state- wide problem.
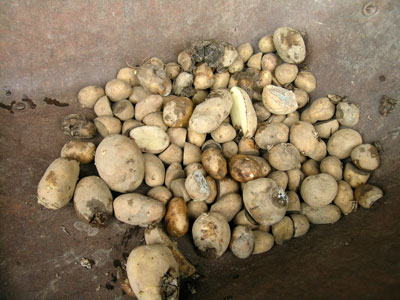
Fusarium Dry Rot – This is probably the greatest cause of loss in storage. It is also the most common problem seen on seed pieces. It can result in seed piece decay after planting and result in uneven stands. A slimy rot often develops when Fusarium dry rotted potato seed is planted. This is a secondary infection by bacteria, which take over. Do not plant seed pieces with Fusarium dry rot.
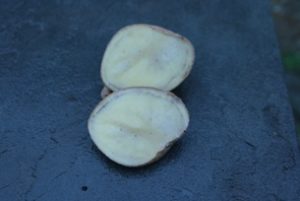
Ring Rot – This is one of the worst diseases you can get on your farm because once you get it, it is very hard to get the farm clean again, and it spreads very easily by the bacteria clinging to boots, crates, and equipment. Check your seed carefully and discard the whole load if any ring rot is found. In the tuber you will see the disease as a break down of the ring of vascular tissue when you cut the potato. Squeezing the tuber will expel creamy, odorless ooze of bacteria. Planting these tubers will introduce the bacteria to your soil.
Scab – Lesions on the tuber are usually circular and seldom larger than a half inch, but in very bad infections they coalesce. They may be a cork like layer or pitted. The layer under the lesion is straw colored. Planting these tubers will introduce the bacteria to your soil.
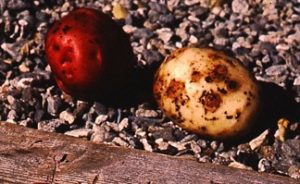
Black Scurf – If you have little black, irregular lumps on the skin of your potatoes that resemble soil but will not wash off, then you have black scurf. This is a disease that is caused by a fungus called Rhizoctonia solani. The black specks are one of the ways the fungus reproduces. They are called sclerotia, which are tight, dry masses of fungal tissue (mycelium) in a resting phase. In the spring the sclerotia germinate and infection of the new potatoes begins. Most commonly, infection of potatoes is from planting potato seed pieces with sclerotia on them, or having done so years ago. Crop rotation is not very effective because sclerotia can survive for many years without a host crop. So, avoid ever planting seed with the disease.
Hollow Heart – Just as the name implies, the center of the potato is hollow. It appears as splitting within the tuber. The inner wall of the hollow part may be white, tan or may be infected with a secondary disease. Hollow heart is not caused by a pathogen but rather by rapid tuber enlargement especially after a period of moisture stress. Potato seed with hollow heart will not spread the disease.
Knobby potatoes – Potatoes with knobs are usually the result of high field temperature and drought or other conditions that cause irregular rates of tuber development. Planting knobby potato seed will not spread the problem.
Top
ASPARAGUS FROST DAMAGE (Some of this came from the UMass. Veg. Newsletter)
We are past any danger of this, but I need to tell this story again. One of the very first questions I received when I began working for MOFGA many, many years ago turned into an argument. Not a good start, huh?. The guy who called would not believe me that asparagus is frost sensitive. His spears had turned dark, wrinkled and water-soaked and I don’t know if I ever convinced him. Perhaps he is reading this.
Asparagus, despite its status as a primo early season vegetable, is highly sensitive to frost, ranking alongside cucumber, snap beans, eggplant and tomatoes in the ‘most susceptible’ category.
When frosted, spears appear slightly darker green, water-soaked and break off easily. Thawed spears become mushy. Soft-rotting bacteria can enter the damaged tissue. New spears take several more days to emerge, but will. Temperatures below 33 degrees Fahrenheit may damage the spears. We saw lots of this back in April when some of our spears mistakenly sprouted too early.
Top
 |
| Common asparagus beetles |
 |
| Common asparagus beetle eggs on an asparagus spear |
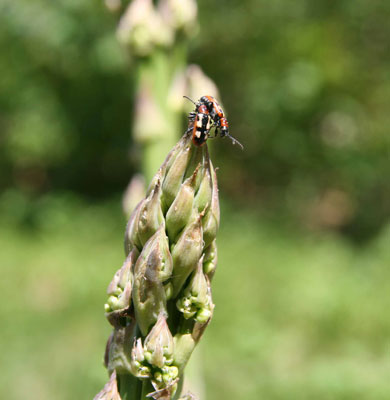
ASPARAGUS BEETLES
Common asparagus beetles tend to arrive in mid May. The spotted asparagus beetle generally becomes active somewhat later in the spring, and in my experience is less common (I guess with the names that is not a surprise). These two beetles are closely related and have similar life cycles but it is the common asparagus beetle that is most damaging.
Common asparagus beetle (Crioceris asparigi) is blue-black, shiny, smooth and about 6 to 9 mm (1/4 inch) long, with three large yellow, squarish spots with red margins along each wing cover. Eggs are black, laid standing on end in rows along the spears, and hatch in 3-8 days (see picture in web version). Larvae are wrinkled, plump, hump-backed, and dull gray with black head and legs. They grow up to 1/3 inch. These larvae feed in spears and in ferns. The larvae do the most damage, and eggs and larval damage makes spears unmarketable. Larval feeding can cause sever defoliation and weaken the stand. When full grown, larvae drop to the soil and pupate underground. New adults emerge in July, feed in ferns, and by September are looking for overwintering sites.
Spotted asparagus beetle (Crioceris duodecimpunctata) is reddish orange or tan, with six black spots on each wing cover (hence its other name, 12-spotted asparagus beetle). Eggs are greenish, glued singly on their sides to leaves. Eggs are laid on fronds, not on spears. Larvae are similar to those described above, but are orange colored, and feed almost entirely inside the berries so they affect seed production but do not hurt the plants.
Winter habitat: Both species spend the winter as adult beetles either in field borders or within the asparagus field. Sheltered sites such as under bark or in the stems of old plants are preferred. Some burrow into the soil.
Cultural controls: During harvest, you can greatly reduce the yearly population by harvesting ALL of the spears that are ready (or ones that will never be good) every harvest day. In other words, pick the field clean in order to eliminate any stems where eggs will survive long enough to hatch. Otherwise larvae can feed and grow up into summer-generation beetles.
In the fall remove all of the crop residue and other refuse nearby that may provide shelter for adults over winter, by disking lightly (avoid crown damage) or burning crop stalks and fronds. Maintaining a clean environment in the fall will force beetles to seek shelter outside the field or burrow in the soil, where many predators reside.
Biocontrol: The most important natural enemy of Common asparagus beetle is a tiny parasitic wasp (Tetrastichus asparagi) that attacks the egg stage. Wasps kill eggs by feeding on them (sucking them dry), and also lay their own eggs inside the beetle eggs. The immature wasps grow inside the beetle larvae, killing them when they pupate. Studies have found >50% of eggs killed by feeding and half of the surviving larvae parasitized. Providing a nearby nectar source such as umbelliferous flowers may enhance wasp populations.
Monitoring and chemical control: Scout fields regularly. You may want to treat spears if >10% of the plants are infested with beetles or 2% have eggs or damage. Usually, I suggest that there is no need to treat spears because you are harvesting all of the ready to eat ones. Besides, daily harvest makes treatment difficult because few want to spray anything close to harvest time.
Treatment with insecticides should begin after you are done harvesting and are letting the spears grow into ferns. Remember, your harvest period ranges from 1-5 weeks depending on the age of your bed.
Organic options for insecticide treatment include Surround WP as a repellent, or best for control, Spinosad (ex. Entrust or Monterey Garden Spray).
Help from: R .Hazzard. References: Handbook of Vegetable Pests by John Capinera; 2008-2009 New England Vegetable Management Guide; Brian Caldwell, Cornell University
Top
  |
| Flea beetle damage |
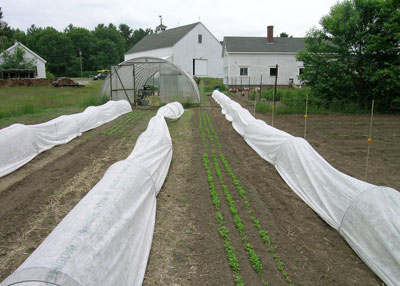 |
| Row covers on hoops. Seal edges immediately after seeding or transplanting Brassica crops. |
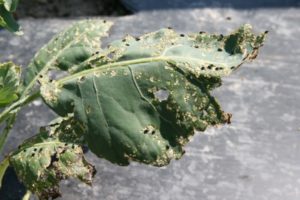
FLEA BEETLES IN BRASSICAS
Flea beetles are busy feeding in spring plantings of brassica crops in some locations in Maine already. Numbers are likely to rise in coming weeks as beetles move out of field borders where they spent the winter. Crucifer and striped flea beetles feed on Brassica crops as well as weeds that are in the same family, such as yellow rocket or wild mustard. [It is a different species of flea beetles that feeds on the tomato family of crops. This is important information when planning rotations of potatoes or tomatoes with Brassica crops or cover crops].
The crucifer flea beetle (Phyllotreta cruciferae) is uniformly black and shiny, about 2 mm in length, while the striped flea beetle (Phyllotreta striolata) has two yellow stripes on its back. Flea beetle adults feed on leaves and stems, resulting in numerous small holes, or ‘shot-holes’. Eggs are laid in the soil starting in late May, and beetle larvae feed on roots. The non-waxy greens (arugula, bok choi, tatsoi, mustard, Chinese cabbage, komatsuna) are preferred to the waxy cabbage, kale and collard types of brassicas. In brassica greens, beetles feed on the whole surface of the leaf, and will continue feeding from the seedling stage until harvest. Waxy crops are most susceptible at the cotyledon and seedling stage and feeding is more limited to leaf margins on older plants. Some crops simply out grow the beetle pressure and the damage can be tolerated. No damage can be tolerated in crops such as arugula.
To reduce and delay flea beetle invasion of spring crops, move them as far away as possible from the fields that were used for Brassica crops last fall. Beetles overwinter in field borders near last year’s crop. Planting the same crop close by to where it was last year ensures a high population in the spring. The same could be true if you have fields full of mustard weeds.
One of the best ways to protect Brassica crops from flea beetles is to place a floating row cover over the bed or row. It is critical to seal the edges immediately after seeding or transplanting, because Brassica seeds germinate quickly and beetles rapidly find the cotyledons. Flea beetles can fit through extremely tiny cracks. Edges of the cover must be sealed on all sides using soil, plastic bags filled with soil, or some other method.
Spinosad (Entrust is organic formulation for farmers, and Monterey Garden Spray for gardeners) is proving to be effective in suppressing flea beetles and reducing damage. Pyrethrin (Pyganic EC 5) showed poor to moderate efficacy in trials, and has a short residual period. Yet some growers have reported a good knockdown with this product. You can spray right through the floating row covers and knock down any flea beetles that may have gotten inside.
Top
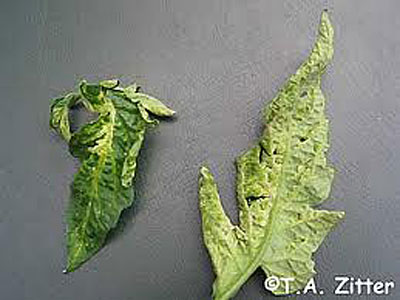 |
| Oedema on tomato |
OEDEMA (EDEMA)
I often get calls this time of year from folks who fear they have a disease on their tomatoes, or related crops such as tomatillo. It is also a common problem in plants in the cabbage family, and some house plants. They see blisters or bumps on the surface of the leaves, most often the underside. The swellings initially appear pale-green, but they can erupt and turn yellow, brown or even black. Eventually, corky spots appear on the underside of the leaves. Older leaves are more often affected than younger leaves.
Oedema is not a disease caused by a pathogen, but rather is a physiological disorder that develops when a plant absorbs water faster than it can be lost from the leaf surface. Excess moisture builds and the blisters form. This is most commonly induced when transpiration is limited. Transpiration (the natural loss of water from the plant) is reduced by cloudy days, humid conditions in a greenhouse, cool temperatures, low light levels such as when plants are raised on a windowsill in a home, etc. Overwatering under these conditions is commonly the biggest factor causing the problem.
Leaves affected with edema never clear up, but there are steps to be taken to prevent more of the problem:
* Cut back on watering, but do not let the plants completely dry out.
* Water only in the morning
* Increase the light if it is low.
* Increase ventilation and avoid over-crowding plants