Spring 2020 Strawberry Update
Seedling Problems
Damping-Off in the Field
Seedcorn and Other Maggots
Hello and welcome to the first Pest Report of 2020.
The Pest Report is a compilation of short discussions of pests, diseases and practical growing considerations relevant to the time of year. The Pest Report is not prescriptive – just a warning of current issues in the broader Northeast region that may or may not reach you, and/or issues that tend to be perennial. Many pest and disease issues come to southern New England before they find us here in Maine, allowing the Pest Report to be an early warning for you.
These discussions have been written by Eric Sideman, myself, and sometimes other New England crop advisors. Discussions of pest and diseases typically include the biology of the organisms themselves, symptoms and effects on plants, and recommended management options. The report is sent by email to all of the MOFGA certified vegetable growers, and other growers who have requested it. You can also view the Pest Report online a day or two after the email is sent. I aim to keep these discussions updated with the most relevant information, and you can always help me do that by sending along pest and disease sightings, or new resources!
Recent snow has made this feel like a late spring, however, the National Phenology Network reports that Portland, Maine is seeing spring leaf out about 2 days earlier than “normal”. This was based on a predictive model interpreting temperature data, and with our recent return to cooler weather we may see that most plants have stalled until warmer daytime temperatures return next week. It’s worth remembering how cold and wet last year was at this time – most fields this year appear to be significantly further along in drying out, and some outdoor field prep and planting has begun on early ground.
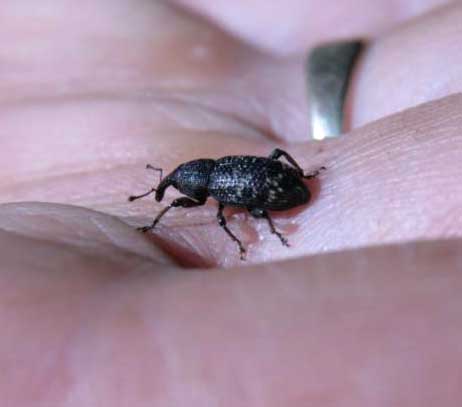 |
| Black vine weevil adult form – Otiorhynchus sulcatus – close relative to strawberry root weevil. Photo Eric Sideman |
SPRING 2020 STRAWBERRY UPDATE
By David Handley, UMaine Cooperative Extension
Strawberries should be uncovered from their winter mulch, if growers have not already done so. Plants that I have seen so far look pretty good overall, with some moderate winter injury in older beds that either were not mulched or had mulch blown off or removed by deer. Speaking of which, deer damage was extensive in some fields and may continue to be a problem if fields are not fenced, as better browse has been slow to emerge this spring. Once strawberries begin to grow, a very light application of nitrogen should be applied to stimulate new growth; about 20 lbs of actual N per acre is recommended. Boron is an important micronutrient in the spring and helps with pollination and fruit development. Only 2 lbs per acre should be applied; more than that can be toxic to the plants. Soluble products such as Solubor (20% B) can be applied with a sprayer to get even distribution across a field.
I have found overwintering two-spotted spider mites in strawberry fields this spring, which can become problematic once temperatures rise and they begin to reproduce. JMS stylet oil or using predatory mites are good management tools in this case. Cyclamen mites have also been reported in one field. These are very small mites that reside within the strawberry crowns, so they are very hard to see. The damage appears as dwarfed, crinkled leaves and general unthriftiness of the plants. Oil or predatory mites may be helpful, or plant roguing if the symptoms are isolated. Other things to look out for in strawberries this spring include red stele root rot, which is more prevalent in cool wet weather, and root weevil larvae; small grubs that feed on strawberry roots causing whole sections of a planting to wilt and die.
SEEDLING PROBLEMS
At this time of the year, most plants are still in greenhouses – a much more controlled setting than gardens and fields. As such, a lot of the problems that pop up are abiotic (i.e., not infectious). Sometimes abiotic issues are transient (e.g., cold temperatures) so it’s good to both check new growth to see how it looks relative to damage or unusual symptoms elsewhere on the same plant, and to check on the health of roots and crown of the plant.
Seedling problems can occur in compost based potting mixes because of the possibility that the compost may be carrying plant pathogens, and it is much more difficult to predict the availability of nutrients from natural sources. Nutrient availability depends on biological activity – which is greatly affected by temperature, moisture and other factors. Many commercially available organic mixes are quite good – consistently free of pathogens, and good with nutrients – but occasionally even these fail.
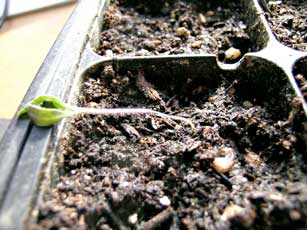 |
| Post-emergent damping-off of tomato seedling |
Damping-off
Damping-off is a disease most commonly seen in young seedlings but may (rarely) effect older seedlings. It is caused by species of fungi that commonly live in the upper layers of soil and jump at the opportunity to infect germinating seeds and seedlings, when conditions allow it to. The most common species that cause damping-off are in the genera Pythium and Rhizoctonia.
There are two types of damping-off. The first is pre-emergence damping-off, which rots the sprouting seed before it breaks through the soil. This can be confused for poor seed germination. The fungus attacks any part of the germinating seed especially the tiny growing tips. Post-emergence damping-off begins as a lesion on the root which extends up to the stem and/or above the soil line. The young stem is constricted by the attack and becomes soft, and the plant falls over and dies.
Damping-off cannot be cured, but it can be prevented by starting seeds in better conditions (or a “sterile” media). First make sure you are using seeds of the highest quality that will germinate and start growing quickly. Old, mistreated, and weak seeds are more susceptible to damping-off, as anything that slows germination increases the risk of infection. Excessive watering, poor drainage, and “less than optimum” temperatures should be avoided. Allowing the surface of the soil mix to dry a bit before each watering helps. If using seedling trays, adding perlite to your potting mix can help to facilitate soil drying and aeration.
It is possible to “sterilize” your media by baking the mix in the oven at 350 °F for about 45 minutes. The mix should reach 160 °F and should stay at that temperature for 30 minutes. Do not allow it to go higher or stay hot longer because overheating kills the beneficial microorganisms and may releases toxic materials. Many growers prefer not to “sterilize” their mixes because organic mixes are living systems and often the interactions of organisms in the mix reduces the impact of the fungi causing damping-off. In other words, if the damping-off pathogens get into a “sterile” mix, they are off and running free of antagonists and competitors (friendly or neutral microbes present in many biologically active composts). Adding a biological treatment to your potting mix, like Rootshield, may help.
Cold Soil/Wet Soil
In addition to encouraging damping-off, cold soil can cause other problems. For example, growing seedlings on window sills is often a problem because of cold night time temperatures. The roots of plants do not function when cold, and plants frequently display symptoms of malnutrition even though the media may have plenty of nutrients. Purple undersides of leaves, stunted growth, pale weak seedlings, etc., are often the results of cold or wet “feet”.
Wet potting mix, or potting mix that doesn’t get a chance to dry out on the surface can also foster algae growth. While algae is harmless to plants, it can form crusts on seedling cells that make even watering more difficult, or possibly slow air diffusion in and out of the potting media, which can hinder root growth and further exacerbate wet potting mix problems. Algae may also foster fungus gnats, which feed on algae and fungus in damp potting media, and then sometimes on your tender seedlings’ roots. The first step in responding to fungus gnats is cultural – reduce the amount of time your cells have surface moisture. In severe infestations, there is an OMRI approved Bt product, and predatory nematodes that can be effective in killing larval and pupal stages of the gnats.
Trying to grow a tiny seedling in a large container may worsen the problem of wet potting mix because the plant is just not big enough to use the water, and over watering may then be a problem the plant cannot grow out of. Perlite can help to improve drainage in a poorly-draining potting mix.
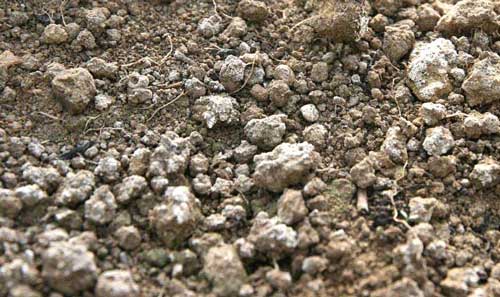 |
| Excess mineral salts on greenhouse soil surface |
Salt
Some composts are high in soluble salts. Even if the salts are nutrient salts such as nitrates, high salts will cause water absorption problems and may prevent seeds from germinating. Salty composts are not a problem in field use because they become diluted with the soil, but in a potting mix it is a real problem. Compost used for potting mix should be the best you can get and should not have salts – measured as conductivity on a compost analysis – higher than 1 mmhos.
Carbon:Nitrogen ratio
The C:N ratio is critical for compost used in potting mixes. A high C:N ratio will result in nitrogen lock up, wherein all the nitrogen in the potting mix, and any you add with fertilizers, is being grabbed by the bacteria feeding on the carbon-rich material. It is a sign that the compost was made from an improper mix of feedstock, or perhaps is just not finished yet. Compost used to make potting mixes should have a C:N ratio of 15:1 to 18:1.
Ammonia
As nitrogen is released from decomposing proteins it passes through a phase where it is an ammonium ion. Unfinished compost will have ammonium ions that may revert to ammonia gas which can kill roots and damage leaves. Ammonia in a compost used for a potting soil should be less than 0.1%. Problems from high ammonia levels can be seen as very weak, dying seedlings which have roots that are brown instead of a nice healthy white. It’s recommendable to get an analysis of any compost you plan to use to build your own seedling mix. The University of Maine Soil Testing Laboratory does compost testing, just be sure that when you send a sample you ask for the compost analysis. If you are buying a commercial compost-based mix you may want to speak to other growers and see how that brand has worked for them.
DAMPING-OFF IN THE FIELD
Damping-off can occur in the field too. This time of year the problem is with peas and spinach. The disease is usually caused by several different species of Pythium, which is a common soil inhabitant that persists in soil and in root debris as spores. The species have a wide host range of crops and weeds so crop rotation will, unfortunately, do little to avoid the problem.
During, or just after germination are when seedlings begin to show symptoms. The symptoms may be as simple as yellowing and stunting – because sometimes only the root tips are infected and this root “pruning” interrupts growth. Sometimes a soft rot of the stem kills the plant. Sometimes you just don’t see any seedlings emerge at all.
High soil moisture and warm soil temperatures (warmer than optimum for pea growth, i.e., 65-75) favors Pythium. You can’t control the weather but you can choose when you plant your peas. If the soil is very wet, and warm weather is forecast, it may make sense to delay planting a few days for the soil to dry a bit.
There are resistant varieties. In peas, the resistance gene is tied to some visual characteristics of the seed. Wrinkled seeds are more severely affected than smooth, round seeds. Also, some biological seed treatments, such as Rootshield, may help.
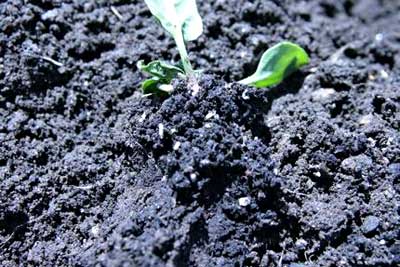 |
| Seedcorn maggots on a spinach seedling |
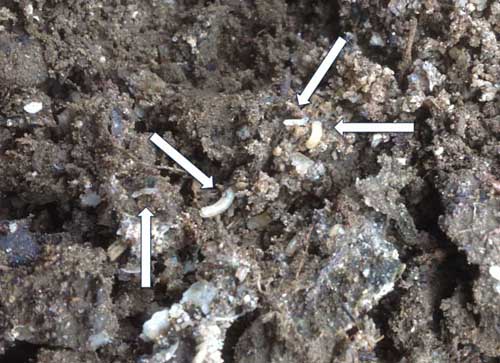 |
| Seedcorn maggots in soil |
SEEDCORN (Hylemya platura) and OTHER MAGGOTS
Now is the time to be aware of the problem. Seedcorn maggot larvae feed on seeds and young seedlings of many crops (corn, beans, beets, peas, spinach, onions, brassicas, etc.). The first symptoms are usually poor germination (or failure of seedlings to emerge), or wilting transplants that have lost their roots to feeding. Symptoms can be difficult to distinguish from other problems, such as damping-off due to Pythium or other soilborne fungi, or wireworm feeding. At least until you dig around a bit and find the maggots.
There are two other common maggot problems here in the Northeast, which are specific to certain crops. These are the onion maggot, and the cabbage maggot (which is a problem in cabbage, broccoli, cauliflower, radish, and other brassica family members). All of these maggots are problems early in the season, and even though they are still around they become less of a problem by late May/early June because there is much lower egg survival in warm soil.
The species of maggots are very hard to tell apart. It would be good to know which you have because the onion and cabbage maggots will become more of a problem year after year if crop rotation is not followed. And, especially with the cabbage maggot, using the wrong cover crop in a field could be a problem (e.g., you would not want to use tillage radish as a fall cover crop in a field you plan to plant to cabbage the following spring).
In contrast to the cabbage and onion maggots, the seed corn maggot is not specifically attracted to a particular crop but rather is attracted to the smell of decaying organic matter. Seed corn maggots have even been shown to be attracted to decaying soybean meal that was applied as a fertilizer at seeding or transplanting. The maggots can usually be found in the soil around and inside seedlings and seeds.
The adults look like small houseflies. The prior season’s last generation of adults lay eggs that hatch into maggots, which feed for a while and then pupate late in the fall. They overwinter in the soil as pupae. In early spring, the adults emerge, fly around, and lay eggs either at the base of their favorite plants, or in the case of the seed corn maggot, where they smell organic matter, such as compost or manure added to a field, decaying seeds (or as mentioned above, maybe even soybean meal added as a fertilizer), etc. The eggs hatch within 2-4 days at soil temperatures of 50F.
Research has shown that peak emergence of the first three generations of seed corn maggot occur when 350, 1080 and 1800 degree days (base 40 F) have accumulated. Peak emergence of the first three cabbage maggot generations occur at 450, 1250 and 2175 degree days (base 40 F). And peak emergence of the first three onion maggot generations occur at 725, 1750 and 2975 degree days (base 40 F).
For predicting the peak emergence of these flies, (and thus, the greatest risk of them laying eggs by crops) degree day accumulation is calculated on a daily basis. To see the degree day (base 40 F) accumulation for your area, find your nearest weather station at https://newa.cornell.edu/ and select either “onion maggot” or “cabbage maggot”. Unfortunately, the closest weather station to you – that is currently reporting that data to NEWA – may be in New Hampshire. There is an effort underway to create a report out of degree day (base 40 F) accumulations from weather stations around Maine, and I’ll be sure to pass along the information when it’s ready!
Another good indicator of cabbage maggot flight is blooming of the common roadside weed, yellow rocket (Barbarea vulgaris).
The first generation of seedcorn maggot usually causes the most damage. The adults prefer to lay eggs in wet soil. Crop seeds that germinate slowly are more vulnerable to attack. Crops that are planted in wet, and or cool soil, may be especially susceptible to damage because of slow growth.
Management strategies:
By the time you see damage, it is too late to control the problem using either cultural or chemical methods. Prevention is the key.
- Avoid seeding fields (especially wet fields) too early. Seeds germinate more quickly and are less vulnerable in warmer and drier soils.
- Disk and incorporate organic matter (such as a cover crop) at least 4 weeks before seeding to give it time to break down and make it less attractive to the flies.
- Avoid applying manure or unfinished compost in late fall or early spring to heavy soils that you might want to plant early. Lighter, well-drained, sandy soils are less likely to have problems (because they warm up and dry out faster than others).
- Rowcovers can help – but only if the maggot flies are coming from elsewhere. Remember, the flies overwinter in the soil as pupae. If you grew a susceptible cover crop, or applied manure in the fall, pupae may be there overwintering, and then flies could end up underneath your rowcover.
- If you need to replant, wait at least 5 days if maggots that you find are a quarter inch long; if they are smaller than that, wait at least 10 days to make sure they have pupated and will not damage the new seeds.
- From UMass Extension: Soil application of the entomopathogenic nematode Steinernema feltiae has shown efficacy against cabbage maggot in trials. Apply by treating transplants prior to setting in the field, in transplant water used in a water wheel transplanter, as a drench after transplanting, or a combination. Post-plant treatments are likely to be needed if maggot flight begins >1 week after transplanting. Rates of 100,000 to 125,000 infective juveniles per transplant have been shown to be needed to achieve reduction in damage. Nematodes need a moist soil environment to survive.
