 |
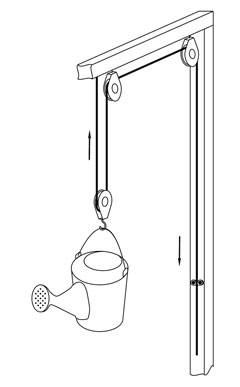
| Figure 1. A watering can makes a handy shower. The user can easily tip the can to get water as needed. Illustration by George Eaton |
 |
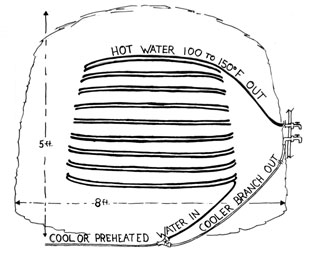
| Figure 2. Loops of poly piping lie in pairs alongside one another, every 4 to 6 inches or so, within the compost pile. Illustration by Dennis Carter |
By Dennis Carter
Have you ever dug into a heap of compost, wood chips or manure and found it to be warm and steamy inside? Bacteria, thriving in these optimal environments, break down organic matter at an accelerated pace and produce significant heat in the process.
My wife and I had long made compost to improve the soil in our garden and orchard, and I began to wonder: How could I harness the compost to heat water? We need an ample supply of hot water at our homestead, the Deer Isle Hostel, because we host about 10 guests every night throughout the summer.
Inspired by Paul Wheaton’s 4-minute YouTube video, “500 Showers Heated from One Small Compost Pile” (https://www.youtube.com/watch?v=-Jm-c9B2_ew), I began pushing toward that same goal for the outdoor shower at the hostel. Beside the shower I built an 8-foot-wide by 5-foot-tall compost pile with 200 feet of half-inch diameter poly pipe coiled inside. I laid a garden hose across the yard to bring in (and preheat, on sunny days) water. We spent about $50 for the roll of poly pipe, the pipe-to-hose adapters and a shutoff valve. All parts are entirely reusable. We recommend using the least-toxic garden hose you can find, especially since the hose will be exposed to the sun and heat. See https://www.ecocenter.org/healthy-stuff/reports/garden-hose-study-2016.
Only one day after making the compost, the thermometer probe in it read 100 F, making the water just hot enough for a comfortable shower! It rose to 145 F in a couple of more days and then gradually settled back down, heating the shower water for a total of four weeks. The water did not heat up endlessly while running through the compost as I had imagined, but was instead available in 4-gallon batches – the volume contained by the piping buried in the compost.
Watering-Can Showering
Because 4 gallons is not a lot of water for a shower, our shower has something more efficient than the common shower head: a watering can suspended overhead (Figure 1). A 2-gallon metal watering can with a hinged wire handle is filled from a tap near the floor of the shower stall. In addition to the hot water coming from the compost pile, a cooler branch comes directly from the garden hose so that the water can be blended to a desirable temperature. The bather hoists the filled can overhead with the aid of a small block and tackle. When the can has been raised to an appropriate height, the lifting line is locked into a cam cleat, a clever device typically found on sailboats to quickly hold or release a rope.
The bather pulls the watering rose of the suspended can down with one hand to get the soft, warm rain flowing. To soap up, the bather releases the rose, the can rights itself and the flow stops. This cuts water use dramatically. The can feels lighter to the touch as it empties, giving the bather a very good sense of how much water remains. Many find that filling the 2-gallon can just once is plenty for freshening up, with two or three fills needed when washing and conditioning long hair.
Taking a two-can, 4-gallon shower takes 10 to 15 minutes – about the amount of time needed for the new batch of water coming into the compost pile to warm up. So several bathers can shower one after another without waiting for the water to heat.
The Sun Helps
Water can be preheated passively before entering the compost pile. A hose or water line lying over warm ground allows for this so long as the ground surface temperature is warmer than the well temperature. Direct sunshine greatly increases the warming and can make the water truly hot. This certainly can happen when a garden hose is left lying in the sun, but the water may gain a strong plastic smell and possibly other contamination. A better option is to use the black water supply line, or poly pipe, as we use inside the compost.
Poly pipe, like milk jugs, is made of #2 plastic, high-density polyethylene (HDPE). The piping is colored black, which allows for good heat absorption and outstanding resistance to photodegradation. Just as water left in a gallon plastic jug in the sun will taste a bit like plastic, HDPE will make the hot water it contains taste that way – an off-taste for drinking, but the water smells good and feels nice in the shower. We did smell some off-gassing when using brand new water lines, however.
Our outdoor shower is now fed via a poly pipe water line coming from a hose spigot on the house. The line lies over some lawn and ledge, where it heats quickly when the sun is out. The more the water has preheated, the less it will cool the pile when it enters. Full solar preheating is not needed for every shower; rather the solar boost on sunny days enables the heap to regain a higher temperature in preparation for the coming sunless period. This method works only in the warmer months, which are concurrent with the outdoor showering season anyway.
Making the Compost
When building the compost pile, I start with an 8-foot circle on the ground. Two 5-foot scraps of 4-inch-diameter perforated pipe are laid with one end of each outside the circle. These deliver needed air into the bottom of the heap. Next comes a layer of wood chips about 10 inches thick. The coarse chips will not compost much in the process but will provide a porous structure that will allow air to flow through the heap. After that I start to include layers of seaweed, providing a nitrogen source for the compost. Other resources, including manure, could be used in place of seaweed, but our compost is plant-based, considering the circumstances of public use.
The poly pipe coil begins to be incorporated once the compost is built up 18 inches or more from ground level. To be in the hottest zone it must be placed 18 inches in from the sides and top. As Figure 2 shows, we lay loops of piping in pairs alongside one another, every 4 to 6 inches or so, as we build the pile. A flat stone or chunk of wood will hold the two loops in place while the next layer of chips, seaweed and possibly hay or other material is added. The pile is built to just over 5 feet tall; beyond that it becomes increasingly difficult to pitch up materials.
The poly pipe comes in a roll that, when freed of its packaging, is about 18 loops, each 3 to 4 feet in diameter. The shape of the compost heap is governed by the coiled form of the poly pipe that will be buried inside. If the sides of the pile taper in too much, the loops of piping must get smaller and will eventually become difficult to deal with. Therefore the pile is best formed as a squat cylinder. However, neither seaweed nor chips naturally pile up with nice vertical sides like a cylinder, but instead slide off the outer edge. Since a fence or enclosure would get in the way of the work, I came up with a special method of building the heap.
After making a level base as described, I pitch seaweed with a fork in a heavy ring, defining the outside rim of the compost pile. Now the top of the pile becomes like a saucer or shallow bowl. During the whole building process, most of the chips and seaweed are added to this outer rim, occasionally packing it with the back of the fork, but all the time leaving the center unpacked and dished out. As always, gravity is pulling any loose material downward, but now it falls mostly toward the middle, thus making a more vertical pile possible. It will still taper some, but much less, allowing the piping to be installed easily.
In recent years I have built the compost-powered water heater with all new organic materials just once a year. Then I do two rebuilds annually, which requires only fetching more seaweed and reshuffling the pile. To minimize the work, I build a second compost pile base next to the first and a second poly pipe coil. As the bigger wood chips do not decompose much in each cycle and will still provide aeration, I simply layer the entire contents of the old pile on the second base together with new seaweed layers and the second heat exchange coil. The water rebounds to showering temperature within 24 to 36 hours in the summer.
I did have a problem, when disassembling the compost-powered water heater, with poking a hole in the poly pipe with the fork. This proved difficult to fix, as the regular stainless steel hose clamps used for the repair quickly corroded, ruining a later setup when the clamps let go and a leak formed. To prevent further mishaps, I blunted the tips of the fork well using a grinder and now take greater care when working with the pile. The poly pipe usually can be pulled out of the pile ahead of the fork during disassembly. Take care not to buckle the pipe, which will stay more rigid when kept pressurized with water.
The compost-heated outdoor shower has worked well for the hostel, and we intend to keep improving it. Please contact me with questions at [email protected]. Better yet, visit the hostel as an overnight guest or for a prearranged tour and experience the shower live.
About the author: Dennis Carter, with Anneli Carter-Sundqvist, runs the Deer Isle Hostel in Deer Isle, Maine, where they also hold numerous workshops. See https://deerislehostel.wordpress.com/.
