This article describes a system for processing waste vegetable matter with red wiggler worms (Eisenia fetida). It begins with construction directions for two worm bins and their base and ends with a list of materials and tools needed. This worm composting system has the following advantages:
- It is made from inexpensive, readily available materials;
- It is sanitary;
- Moisture control and aeration are automatic;
- The design can be scaled to work in a wide range of situations, from single-person households to school cafeterias; and
- Worms are separated from the compost automatically using the natural tendency of worms to migrate in search of food, moisture, companionship and warmth.
The base is basically a big, shallow box filled with sand. The outside dimensions are 38.5 inches on the front and back and 35 inches on the sides. The sides are nailed to a plywood bottom to add strength. The sides are tapered from 3.5 inches at the front to 5 inches at the back. A piece of foam insulation the same size as the base is placed between the floor and the base to minimize heat loss. After the base is set in its final location, fill it with sand and use a piece of scrap lumber to smooth the sand so that it follows the incline of the tapered sides. Having two empty bins will help you get it right on the first try (Figure 1).
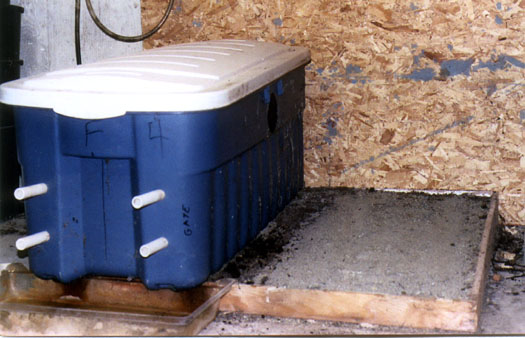 |
| The worm bin sits on a base of sand, preferably with a piece of foam insulation between the floor and the sand base to minimize heat loss. Photo by Adam Tomash. |
The base plays a very important role here because we are asking a plastic container that left the factory thinking it was going to hold a bunch of sweaters to hold more than 250 pounds of worm compost (also known as worm castings) instead. Because the bottoms of these containers are not perfectly flat, they need the contoured support that the sand offers. If you ever see the sides bulging excessively or the front overhang deforming, stop adding waste and move on to the next bin.
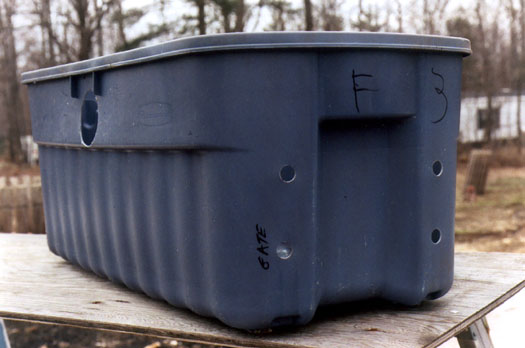
Set up a large table on a level floor. Put the two 50-gallon bins on the table, long sides touching and fronts flush with each other. Mark the two front ends with a large letter “F” for front. Mark the right-hand bin with the number 1 and the left-hand bin with the number 2. Use sequential numbers if you build more than two to assist in record keeping. Put a mark near the center of the top rim of each bin on the two long sides that are touching each other. This is just a reference mark so that you don’t get confused when drilling the large hole for the gateway. The gateway hole must go on the same side of the bin as these marks.
The instructions below will help those who are intimidated by such projects. However for the more experienced, a quick look at the photo of the drilled bin will suffice (Figure 2). We will be drilling four, 7/8-inch holes on each end of two 50-gallon worm bins where aeration tubes will be inserted. We will also drill one large hole on a side of each worm bin for the gateway. The large holes will be on facing, long sides. Some smaller holes for drainage will also be drilled on the underside of the bins at the front end.
 |
| A gateway hole is cut near the top of the long side of the worm bin. Photo by Adam Tomash. |
Find and mark the center of the handle of each “F” side. Draw a perpendicular line from this mark down the center. If your work surface is flat and level, you can use a square or level to help. Since the sides are curved, measuring from the corners is difficult. Measure and place marks 11.5 inches from the top lid and 5.5 inches from the center line, one mark on either side of the center line. Repeat this process 7.5 inches from the top and 5.25 inches from center line. You should have four marks that are located as in the photos. Repeat this marking process for the opposite end. Using the 7/8-inch Forstner bit, drill at the eight marks on the two ends. Repeat this process on the second bin. A cardboard template will speed things if you are making more than a few bins.
Make sure you are working on the side that has the reference mark on the long-side rim. The gateway has two tapered, pipe-like extensions on it, each with an outside diameter of 3.75 inches. It is better to drill the hole a little smaller and use a file or Dreml tool to get a good snug fit. The side of the bin has two ridges just under the middle of the long-side rim. Find the middle between these two ridges and make a mark. The long side also has a raised embossing that goes down about 5 1/8 inches from the underside edge of the rim. Use a square to extend the center mark down the side for the length of the flat embossing. The entire hole must be on this flat embossing. Make a tracing of the gate pipe and cut it out to make sure you don’t mess up. Draw a line through the center of the tracing. Line up this center line on the tracing with the center line on the bin and trace the circle onto the bin. Cut or drill out the plastic, staying on the inside of the tracing line (see “Tool List” for hints). Check the gateway against the tracing to see how much you need to compensate to have a tight fit. Trim the plastic of the bin hole until the gateway pipe can slide in about 1/2 inch and has a snug press-fit. Repeat on the second bin, again making sure you are on the side with the reference mark and that the hole on this second bin is perfectly lined up with the hole on the first bin (Figure 2).
Drill a small hole in the middle of the finger lip on the sliding door of the gateway so that you can attach a rope. Attach a piece of scrap rope (Figure 3).
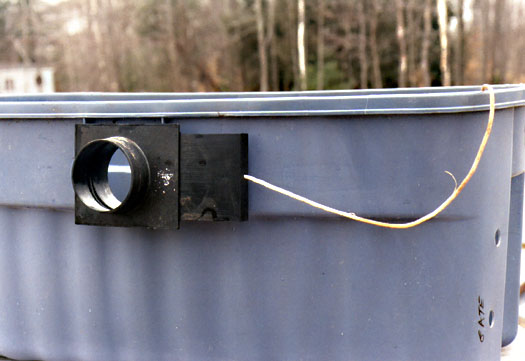 |
| A piece of rope is attached to the sliding door of the gateway. Photo by Adam Tomash. |
Flip both bins over and drill two 1/4-inch holes in each of the 2-by-3-inch raised bumps on the “F” side. These bumps are set back a little from the short side of the bin right behind a notch on the model that I used. The drainage holes must be on the “F” side or the bins won’t work right. When you set up the bins, make sure these drain holes are not over the base. They must hang out in the open right over the drain pan, or the plywood base and sand will get soaked.
Using a fine-tooth saw, cut two 44-inch lengths from one 10-foot section of 3/4-inch PVC pipe. Repeat to get two more for the second bin. These are the bottom air tubes. Since the sides of the bin are sloped, the top pipes must be slightly longer. Don’t scrimp here. The weight of the compost will bow them, and if they are too short, they will pop out of the bin walls. Use your last two 10-foot PVC pipes to cut four 45-inch pieces. Bevel one end of each pipe to aid insertion.
Place a tube on a flat surface, and starting 3 inches from the end, cut small diagonal slits in the pipe so that the cut just breaks into the interior. Continue sawing until you have a slit with no plastic showing for about 1/4 inch. Saw deeper, and the pipe is weakened. Saw less, and insufficient air can get through. For a neat job, saw only on the side that has the lettering (Figure 4). When inserted into the bin, the cuts should all face down. Stop sawing when you reach the last 3 inches of pipe. Repeat for all pipes.
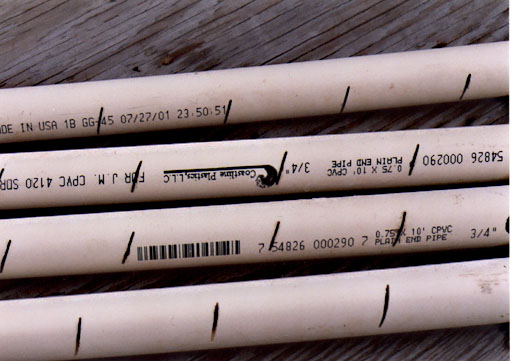 |
| Saw small diagonal slits in the PVC pipe to make aeration tubes. Photo by Adam Tomash. |
Insert the pipes into the bins, beveled end first. The 44-inch pieces go into the two bottom holes, and the 45-inch pieces go into the top two holes. Insert the gateway into the a bin with door/rope facing “F.” Place this bin on the base (Figure 5). Put the second bin on the base and slide it over so that the gate lines up with the hole. Slide the second bin over the gateway pipe until it is seated firmly (Figure 6).
 |
| A completed bin sits on the sand base. Photo by Adam Tomash. |
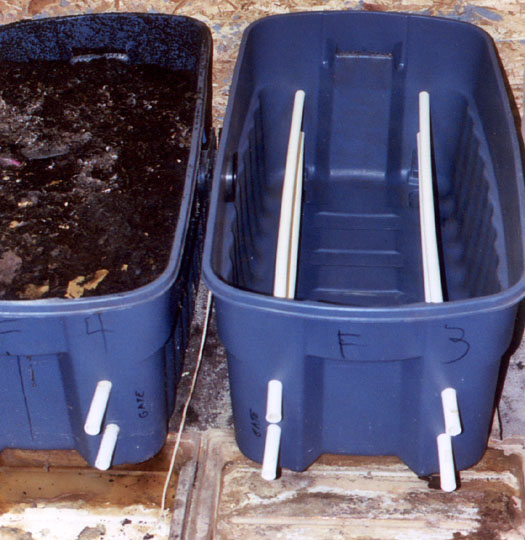 |
| A second bin is placed on the sand base so that the gateway pipe connects the two bins. When the worms have finished digesting the waste in the first bin, the gateway is opened and they migrate through the gateway pipe to the second bin. Photo by Adam Tomash. |
Once the bins are more than half full, they are too heavy to move easily. Before you start, make sure the bins are positioned correctly. Give some thought to location before you fill the base with sand, because it too is too heavy to move easily. The floor under the bins must have enough strength to support what can easily weigh more than 700 pounds when both bins are full. A basement with a level concrete floor is ideal. Keep the bins away from direct light (window) and machinery such as furnaces, pumps, et cetera.
You will also need bedding (peat, coconut fiber, unfinished compost, shredded leaves, etc.) to last the winter (one 35-gallon garbage can per bin) and a large container to hold the drainage from the bins.
Pour some water in the bins to make sure they drain properly into their drain pans. For drain pans, I use green, fiberglass, heavy-duty plant trays or the domes that fit them–both sold by Fedco’s division called Organic Growers Supply (OGS). The domes are pretty flimsy if full. The trays hold less but are more rigid. The base specifications allow the use of either.
Cut a piece of porous landscape cloth to fit the bottom of each bin. This just keeps the worms from escaping out the drain holes and filters the drainage liquid. On top of the landscape cloth, place about an inch of moistened peat moss or coconut fiber (also known as coir). You will probably need to soak either overnight to get maximum absorption.
When you obtain your worms, try to get a pound or so of castings as well. Sprinkle these on top of the peat/coir to inoculate the bin. If you don’t have any castings, use well-matured compost or rich, sifted garden soil.
Now you are ready to start putting waste in. I keep a 1-gallon bucket with a tight lid in the kitchen for worm food. Have another container for food that is not suitable for worms and is destined for the regular compost heap. Dump vegetable waste on top of the inoculated bedding in a layer about an inch thick. Place a layer of bedding on top of this waste. If you have lots, put a half-inch on. If your supplies are limited, use less. Order your worms so that they arrive after the first layer or two of waste have been around for a week or so. This allows time for it to break down a little, and the worms will relish the soft, rotting waste. Close the gate before you add the worms.
If you buy only a pound or two of worms, you will have to pace the addition of new waste to the worms’ ability to consume it. Don’t overwhelm them. After three to six months, their population will have grown enough to keep pace with your ability to deliver food to them. The daily routine then becomes the following: a) empty drain pan; 2) add waste; 3) cover waste with bedding; 4) rinse waste container into bin. If your waste is fresh garden waste, it will have enough moisture to sustain the worms, and the excess will drain out. After you stop adding new waste, the drainage will slow dramatically. If the castings still have worms in them and they are drying down, you may moisten them with water or drainage from a more active bin. Worm castings hold water very well, so go easy on the liquid lest you exclude air and kill worms. If the compost is finished and the gateway is open to another bin, you don’t really need to worry about it being too dry, because the worms will simply migrate to the moister bin.
After the first bin is full, you may begin to add waste to the second bin after following the same procedure outlined under “Starting Up: The First Bin.” Leave the gate closed until the worms have finished eating all the waste in the first bin and the castings look like soft, black peat or rich soil. If the second bin fills before the first bin reaches this stage, you need more capacity (build more bins) or more worms or both. When conditions are as described above, you may open the gate. In two to six months after the gate is opened, the first bin will be ready for harvest of worm-free compost. Number your bins and keep a logbook of when each stage is reached, e.g., “bin started,” “bin full,” “compost finished,” “gate opened,” et cetera. If you built a really big base and put many bins together in a straight line, each connected to the other (except for first and last), you would have an expandable, scalable, continuous-process composting operation.
| 2 | 50-gallon Rubbermaid Roughtote storage containers | $30 |
| 4 | 10 foot lengths of 3/4 inch PVC pipes | $10 |
| 1 | 4-inch plastic blastgate and piece of rope* | $10 |
| 1 | scrap of building foam for insulation | $0 |
| 1 | sheet of 1/2 inch plywood exterior | $15 |
| 3 | bags of sand to fill base | $6 |
| 1 | 3- by 6-foot piece of landscape cloth to line bin bottoms | $2 |
| 1 | 3- by 6-foot piece of landscape cloth for covers (optional) | $2 |
| 4 oz. | galvanized 6d nails | $2 |
Tool List
- Hand or electric saw to cut plywood
- Fine-tooth saw to cut PVC pipe
- Hammer
- 7/8-inch Forstner bit to cut hole for 3/4-inch PVC pipe*
- Electric drill
- 1/4-inch bit for drain holes
- Tool to cut holes for 4-inch blast gate.*
* I have an adjustable bit designed to cut plastic and soft metal. You could use a hole saw or mark with a compass and cut with a saber saw, or drill holes on the line and then cut between the holes with a sharp razor. Go slowly and make the hole smaller than needed. Finish off to size with a Dreml tool, file or sandpaper.
Resource List
Woodworkers Warehouse
1-888-234-8665
Gateway for homemade worm bins (they call them 4-inch plastic blast gates- DF1106, $7.00) and Forstner bits (YB7TX, $10 on sale)
Fedco Seeds/Organic Growers Supply
207-873-7333
Coir bedding, minerals, drain trays
Home Depot–Plastic bins and landscape cloth
Local lumberyard –Foam, PVC water pipe and plywood
Econet (www.worm-a-roo.com) or Vermico (www.vermico.com)–worms to start. Expect to pay about $20 to $30 per pound for worms. Local product saves shipping and stress on the worms.
About the author: Adam Tomash was part of the early ‘70s hippie immigration to Maine and has been a gardener since 1967. He gardens and does Macintosh computer consulting from his home in West Gardiner. His six worm bins produce almost a ton of castings a year.
This article is provided by the Maine Organic Farmers and Gardeners Association (MOFGA), PO Box 170, Unity, ME 04988; 207-568-4142; [email protected]; www.mofga.org. Joining MOFGA helps support and promote organic farming and gardening in Maine and helps Maine consumers enjoy more healthful, Maine-grown food. Copyright 2007 by the Maine Organic Farmers and Gardeners Association.