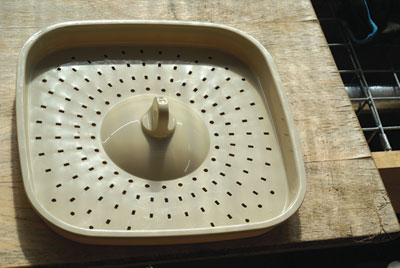
 |
| Fig. 1 – A VermiTek drain pan. |
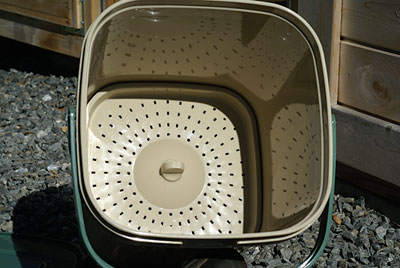 |
| Fig. 2 – The VermiTek drain pan installed |
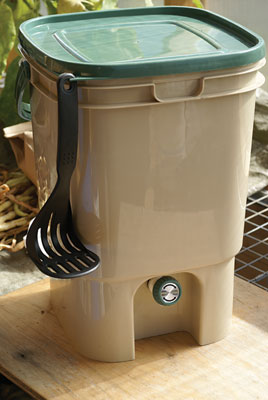 |
| Fig. 3 – The completed VermiTek bin with tamper |
By Adam Tomash
Photos by the author
I love to compost stuff and have been doing it for 50 years – the last 40 in Maine, with its cold winter. I don’t like trudging to the outdoor compost pile in winter. I have to clear a path and brave the cold to get kitchen waste to the pile, and then it just sits there until spring.
My first attempt at avoiding this unpleasant and unproductive ritual was to build worm bins and put them in my basement. That works pretty well but has three major drawbacks: One must have a basement; smells are unpleasant; and clouds of fungus gnats and sometimes fruit flies appear. My search for the perfect solution continues, but bokashi is an important milestone.
Bokashi is the Japanese word for “fermented organic matter.” I think I first heard about bokashi composting when I bought some EM-1 (Effective Microbes) inoculant from Organic Growers Supply/Fedco. This is a blend of yeasts, actinomycetes, photosynthetic bacteria and lactic acid bacteria developed by Dr. Teruo Higa.
Perhaps during a Google search I discovered that the EM-1 inoculant is also used to initiate an anaerobic decomposition process in waste organic matter akin to pickling. The process releases copious amounts of liquid and shrinks the volume considerably. I increased the purchased 1-liter of EM-1 more than 20-fold by following the “activation” sidebar in the Fedco catalog. This is no more difficult than brewing beer. The Internet is full of descriptions of ways to make similar products using rice and milk, but I cannot vouch for any of them.
I decided to try my hand at bokashi composting, modifying Dr. Higa’s original method. Higa used rice bran treated with EM-1 and then dried to cover each layer of kitchen waste. Because this special inoculated rice bran must be purchased and is expensive, I substituted wheat bran, which costs $12 for 50 pounds at the local Agway. I put a layer of wheat bran on top of the kitchen waste and then drizzle about a pint of activated EM-1 product on top of the bran. This seems to work and saves a lot of time and money. See www.cityfarmer.org/bokashi.html for directions on how to make dried inoculated bran.
My basic process involves a layer of garbage, then bran, then EM-1, repeated until the bin is full. Then I let that rest for two weeks, after which I bury it in a part of my garden that could use some improvement. Having two small bins allows one to rest while the composting process continues in the other.
The big advantage to bokashi is that it doesn’t create unpleasant odors during decomposition. Proponents also claim that almost any kind of organic matter can be processed, including meat, fish and dairy. (I can’t vouch for that as I use only vegetable matter in my bins). This means that people who live in small houses or in apartments in urban areas can have a small bin or two in their kitchen. If they have even a small backyard in which to bury their bokashi, they can compost and don’t need to fear animals digging it up or neighbors complaining about smell. Since I have a basement, I can store up a winter’s worth of kitchen waste in two 32-gallon plastic garbage cans (one garbage can per person for the whole winter). This means no more trips to the outside compost pile during the cold months!
One caveat: Although bokashi does not have an offensive odor while in the bin, the liquid that drains from it and the bin contents will develop a foul odor once exposed to air unless buried in soil within a day or so. That is the nature of the beast. I know this because I attempted to get my worms to finish off the bokashi and turn it into worm castings. They seemed to relish the feast of predigested garbage, but the basement smelled somewhat unpleasant for a couple of days, and the liquid draining from the worm bins had a strong odor. The only solution seems to be to bury the bokashi bin contents in outside soil. Under those conditions it does not smell, and animals will be much less attracted to it than to fresh garbage. Dig a trench about 10 to 12 inches deep, pour in the bokashi, mix in a small quantity of soil and then bury with the remaining soil. Being curious, I dug down in the trench in a week and was amazed at how fast the organic matter had been converted into stable humus.
Following are two types of containers for making bokashi compost – a small-scale (homemade and purchased) and a homemade large-scale. The latter is for people who have some out-of-the-way place that doesn’t freeze, such as a basement or heated garage. The smaller containers can be used in conjunction with the larger container. Use small containers for the kitchen, then dump their contents into larger ones in basement.
Small-scale Container
One can buy kits online for making bokashi. They all look like they came from the same mold, so I suspect a factory somewhere makes them for everybody. I tried one from VermiTek with the following components: a rectangular 4- to 5-gallon bucket with drain valve and perforated platform and reservoir for liquid; 2 pounds of bokashi-inoculated rice bran; an airtight lid; a plastic “masher” to mash down the waste; a cup for drainage; and a small, very cute (but useless) metal garbage can with plastic liner (picture not included) for kitchen waste.
The inside of the bucket has a ledge with a chamber below to collect drainage and a valve in that chamber. Install the included drain valve in that chamber and then place the plastic grate on the ledge. Close the drain valve. (Figs. 1, 2, 3).
To use this container:
1. Place kitchen waste in the bucket and sprinkle a handful of the dried bokashi bran mix that came with the kit over every layer of waste. I use approximately 1 tablespoon of mix for every cup of waste. When adding high-protein foods, such as meat, fish, cheese and eggs, use more of the Bokashi One Mix that came with the kit. (If you chose not to buy inoculated bran OR if you buy a bin that does not come with such a mix, you can follow general directions for the 32-gallon bin below and be successful.) Chop material as fine as you can and, after adding bran and EM-1, pack it down to exclude as much air as possible.
2. Check that the lid is closed tightly at all times.
3. Regularly drain the bokashi juice produced using the tap at the base of the bucket.
4. Repeat this layering process until the first bokashi bucket is full.
5. Once full, set the bucket aside to ferment for two weeks; if this is not practical, bury the waste immediately. If you have two bokashi buckets, begin the process again in your second bucket, allowing the contents of the first bucket to continue to ferment. Continue to drain off the bokashi juice regularly.
6. Wash your bokashi bucket after each use.
The lid on this unit from VermiTek is relatively difficult to put on and remove. The rest of the set up is decent. I think some improvements and simplifications are in order, but this setup is a good place to start. One simplification would be to get rid of the drain and use a little extra dry bran to absorb liquid.
Two people will fill a 5-gallon bin in seven to 10 days. If I decided to skip the drain, I could just use 5-gallon buckets, which are widely available. It is a chore, however, to get the lids on and off, unless you get a Gamma Seal lid retrofit for a 5-gallon bucket. These cost about $8 at Home Depot and provide an air-tight seal that can be opened and closed with one hand. If I have two of these buckets, I can leave the full one to ferment a little longer while I fill the other. If I have only one, I have to empty it as soon as it is full. If I build a 32-gallon bin as described in the next section, then I can keep the 5-gallon bucket upstairs and, when full, just empty it into the 32-gallon bokashi bin that I have elsewhere in the house. The VermiTek outfit costs about $60, but a Gamma Seal lid alone is only $8 to $15. A Gamma Seal lid and new food-grade bucket together cost about $25.
Large-scale Container
The large-scale container (bin) is basically a 32-gallon plastic garbage container with minor modifications. One needs to fit a drain, provide filtration to prevent the drain tube from clogging, and provide a container to collect the drainage. The entire bin must be elevated about a foot so that it drains by gravity, and the bin must be sealed off from the air. The barbed tube and 1/4-inch tubing for the drainage system can be ordered as a pair from OGS/Fedco, which offers a set of three barbed connectors and three lengths (3 feet each) of 1/4-inch hose to fit on the barbed connector. You need a repurposed plastic 1-gallon jug to fit on the other end of the tubing.
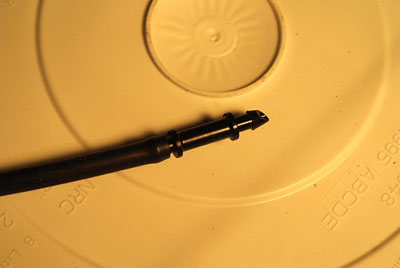
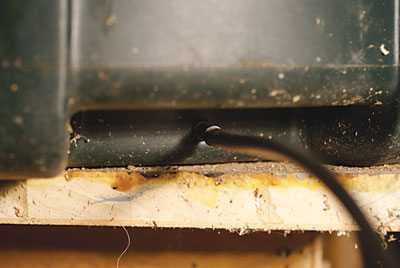
Fitting the drainage system: If the garbage can has handhold recesses molded into the bottom, they make a good place to locate the drainage port. The system consists of three parts: a double-ended, barbed connector; a length of 1/4-inch plastic tubing; and a 1-gallon plastic jug with a cap drilled to receive the tubing (figs. 4, 5). To make the system, drill a 5/32-(0.156-) inch hole close to the middle of the handhold recess. The diameter of the barbed tube is 0.176 inch where it contacts the can wall, but it is 0.218 inch at its widest part, so it will be a tight fit but it will work if you use a 5/32-inch drill.
 |
 |
|
| Fig. 4 – A double-ended, barbed connector and a length of 1/4-inch plastic tubing | Fig. 5 – Drainage tube inserted into large bin | |
 |
 |
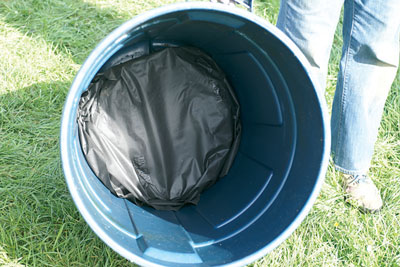 |
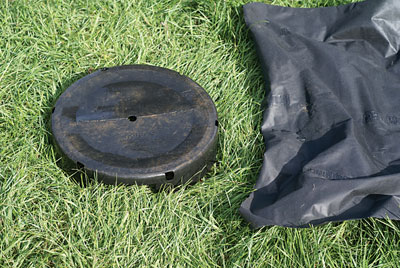
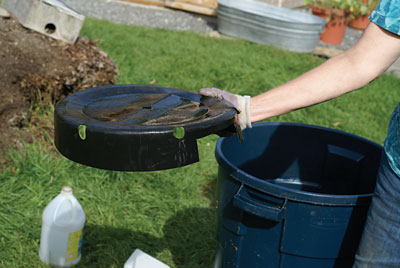
| Fig. 6 – A bokashi drain pan made from the bottom of a large nursery pot and plastic landscape cloth | Fig. 7 – The bokashi drain pan with notches cut with a razor or jig saw if the plastic is thick. One notch to fit over the hand recess bump-out is enough. Cover the pan with landscape fabric. | Fig. 8 – Elevated drainage platform covered with landscape cloth and installed in the bokashi bin |
Insert one end of the barbed connector into the tubing. Cut the other end of the tubing after you have set the bin on its elevated platform so that the end without the connector will reach the top of the drainage jug with a few inches to go inside the jug. Insert the barbed connector with attached tubing into the bokashi bin’s predrilled hole in the handhold recess. If necessary use pliers to apply enough force to insert it and warm the plastic garbage can hole with a hair dryer. If you mess up and it looks like the container might leak, just slap some silicone sealant/caulk on the juncture between the can and the barbed tube. Using the 1/4-inch tube as a guide, drill a hole in the center of the cap for the gallon jug. Insert the tube into the cap. When fitting the 1/4-inch tubing to the drainage jug, do not tighten the jug lid too tightly so as to avoid airlock and prevent a free flow of liquid. Place the jug in a plastic bucket to catch any overflow if you don’t empty it in time. See figure 9 for the greenhouse setup.
Liquid from this jug can be used as a fertilizer if you dilute 1 teaspoon per 2 quarts of water. It can also be put back into the bokashi bin with extra bran to absorb the moisture. I am guessing that this liquid has all the beneficial organisms that the original EM-1 starter had and could be used in the same way. Potential uses for this liquid include sharing it with neighbors; helping the big old outside compost heap to decompose; starting another bokashi bin; or putting it in toilet and house drains to clear clogs.
Making the filtration system: Small bits of bran or garbage that plug the drainage hole will create one sorry, soggy mess when it’s time to empty the large bokashi bin. We avoid that clogging in any number of ways, all involving some sort of water-permeable cloth such as landscape cloth. It should be made of something such as plastic or nylon that doesn’t rot. I use a platform made from the bottom few inches of a very large plastic nursery pot with extra holes and covered with landscape cloth (figs. 6, 7, 8). Notch the sawed-off nursery pot (SONP) so that it sits against the wall of the bin and covers the area near the drainage port. Cover the SONP with landscape cloth. Once the drainage/filtration system is in place, move the bin and its elevating platform to its permanent location and start composting. I set my bin up in late spring behind the garage in the shade. In the fall and or early spring, I put it in my little unheated greenhouse. In the winter it lives in the basement. It always sits on cement blocks or heavy-duty wooden crates or blocking so that excess liquid flows by gravity into the drainage jug (fig. 9).
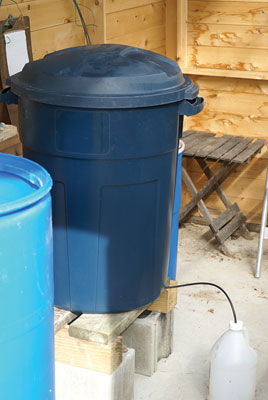 |
| Fig. 9 – A 32-gallon bokashi container in a greenhouse |
Note: Increasing the amount of EM-1 from the original purchased quantity requires an air-tight container, molasses, water and an airlock. Carboys (such as the large drinking water bottles) and airlocks can be purchased at a brewing supply store. Dissolve 1 pint of molasses in 20 pints of warm water, mix well and then add a half bottle (1 pint or 500 cc) of the EM-1 as purchased and mix again. Leave the activated EM-1 mix undisturbed in a warm place until bubbling ceases and then for another five to seven days before use. The pH should be around 3.8 – if you have a way to test pH. If you don’t, go ahead and use it. The Fedco catalog suggests pH paper, but I find it is difficult to gauge pH, as color differences for the range it covers are minimal. I use about a pint of the activated stuff undiluted in the bokashi bins with each layer of bran and waste.
Fedco Organic Growers Supply is selling VermiTek bokashi buckets at https://www.fedcoseeds.com/ogs/.
