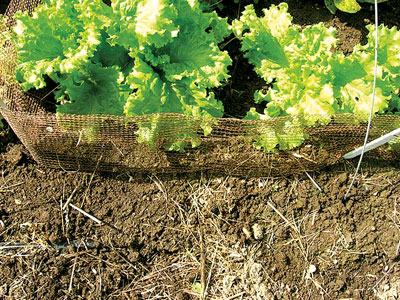
 |
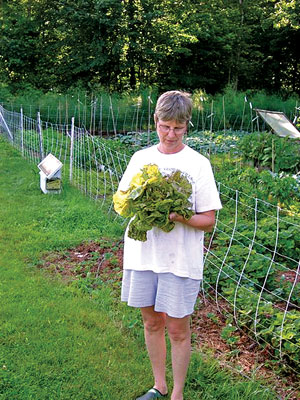
| June Zellers with lettuce grown safely inside the protection of a low electric fence. Note the charger housing in the background. Tomash photo. |
Strategies That Work: Fences and Traps
© Adam Tomash 2010
When the corn is coming in or the cabbage transplants just went out, I have trouble sleeping unless I know my “babies” are safe and won’t be devoured in the night by hungry herbivores. So a long time ago I vowed to keep those herbivores away from my food, preferably without killing them.
Control methods vary according to the pest pressures, the crop, the weather, and interactions among these, so some methods work SOME years but not ALL years. I will describe a few that have worked consistently over 30 years. The primary focus of these strategies is using electric fencing, physical barriers and traps to prevent large and small mammals from damaging your garden.
Electric Fence
Electric fencing, made of plastic with strands of stainless steel woven in, is very fast to set up, easy to move and maintain, and reasonably priced over its 10-year life span. In 30 years, my electric fences have been breached twice by startled animals that got their horns snagged in the mesh, but I have never lost a plant to critters bigger than a small rodent – despite some intense pest pressures. The cost to set up such a fence may discourage some gardeners, but affordable solutions exist.
Before installing an electric fence, know which predator you want to exclude and how determined it is. A fence that will exclude deer may not exclude woodchucks, and vice versa. Animals that had free rein in your garden before you erected the fence will be more determined than those who never had access. Put the fence up before you start a garden or orchard. If you are erecting a new fence around an old garden that had predator damage, train the existing animal population to respect the fence. (See “Training,” below.)
Mesh Fencing
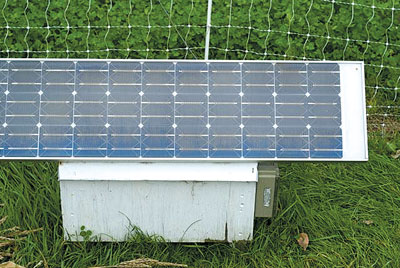 |
| A 40-watt solar panel on top of a homemade battery/charge controller box with the fence energizer on the right hand side. Tomash photo. |
The simplest way to control a variety of predators is to pick a fence with closer spaced electrified wires (hot wires) on the bottom and more widely spaced wires at the top. This will exclude most predators if the fence is tall enough. Unfortunately it will also exclude some predators that feed on small rodents that can slip through the electric wires – but rodents can be trapped (discussed later). I buy Premier electric fence from Wellscroft Fence Systems (see Resources). I will use page numbers and nomenclature from the Wellscroft/Premier 2010 catalog to describe fencing.
So, for example, a Versanet™ fence excludes most wildlife (raccoons, woodchucks, opossums, rabbits, dogs, cats, skunks and birds that don’t fly much, such as wild turkeys). It has 9 (or 11) horizontal strands and is 20 (or 30) inches high with vertical strands 3 inches apart. Its catalog code is 9/20/3 (or 11/30/3). The taller the fence, the more horizontal strands involved. Read the catalog copy to see how far apart the lowest strands are. In this case they are 2 inches apart, so the lower rectangles are 2 x 3 inches. That won’t keep a chipmunk or woods rat out but works for everything else.
We have used a short fence similar to that described above to protect a small kitchen garden, and nothing bothers the succulent lettuces in it, not even deer that could easily step over the fence. A strand or two of electrified horse tape above the mesh fence can improve this setup to deter moderate deer pressure. If deer pressure is high, a high net is better.
Once animals learn what these fences can do, they have more respect for fences in general. Our neighbor’s dog touched one of our electrified garden fences when he was a young. He went right home and for nine years would not set foot on our property unless his master was with him; even then he would not approach the fence.
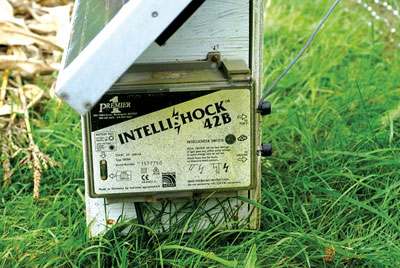 |
| This fence energizer converts the steady 12 volts from the battery inside the box to a series of 3000 to 5000-volt pulses to the fence matrix. Tomash photo. |
Another type of fence, PermaNet™, has smaller holes on the bottom but is taller. Sample codes for this fence are 12/48/3 or 19/68/3. Both have horizontal spacing that changes from every 2 inches to 4, 6 and then 8 inches as the fence goes up. The 12/48/3 works well for our bigger gardens. Intense deer pressure may require the taller 19/68/3, coupled with thoroughly training deer before you complete the fence. The Premier catalog (p. 58) summarizes managing deer behavior with electric fence. Do not neglect this, or the electric fence will not achieve its potential.
Most of Premier’s fencing includes poles that are plastic on top with a metal spike that goes in the ground. When setting the fence up, avoid getting a hot wire caught in the metal pole, or you will cripple the fence. If you hear a sharp “zap” when the fence is running, you have a dead short. Find it or it will drain the battery and reduce the voltage (normally between 3000-5000 v) in the fence to an ineffective level. Rolls of fence generally come in two or three lengths. Lengths beyond 80 feet are heavy. If you are older or frail, get smaller rolls and splice them together with clips that come with the fence. It helps to have two people put up or take down the fence, but one person can handle rolls of 80 feet or so.
Chargers/Energizers
The energizer converts a lower voltage to a very high voltage to activate the fence. The voltage is about one-third that in high-tension power lines, but the amperage is so low that it does not pose a serious threat unless you are a small child or have a heart condition. If young children are visiting, shut the fence off then. For your own children, make the fence easy for them to shut off without getting near it.
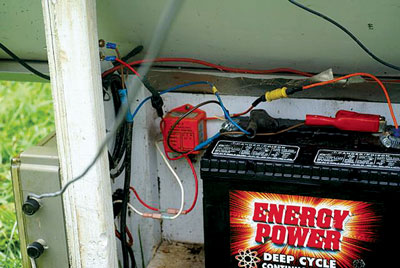 |
| The interior of the box with fence energizer on the left (outside), and the orange voltage regulator that prevents the battery from being overcharged by the solar panel and the battery itself. Each battery terminal has two connectors, one from the voltage regulator (charge controller) and one going to the fence energizer – power in and power out. A terminal strip makes it easier to disconnect the solar panel from the circuits (the pink terminals on the white and red wires). Tomash photo. |
Energizers run on batteries or 110 VAC electricity (110v alternating current – normal household voltage). Battery-type energizers usually run on 12v deep-cycle batteries with or without solar rechargers. The simplest energizer runs on D batteries or a 12v battery and costs about $130 (Speedrite AN90 – a favorite of beekeepers for bear protection); the best costs more than $500. A chart in the Premier catalog (page 88) compares chargers that Premier sells, and its Web site sells others, including the AN90. The measurement of the “jolt” an energizer produces is given in Joules; a larger number means a bigger jolt and more power to damage weeds and brush that touch the fence.
We run two fences simultaneously with an Intellishock 42B charger rated at 0.9 Joules. It runs less than 400 feet of fence for us, with an average weed load. That charger could do a lot more. We couple it with a 40-watt solar panel, voltage regulating charge controller and a deep cycle 12v battery, and it does well. I used the large panel because I had it. Such a big a panel mandated a charge controller even on a very large deep cycle battery. The current cost of the 42B is $244, but most people can get by with a smaller and cheaper energizer. If in doubt, measure the perimeter of the area you wish to fence, call Wellscroft, and they’ll help you pick your charger and fence.
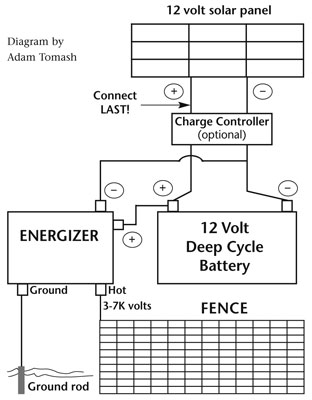
Solar panels can be affixed to a battery to keep it charged so that maintenance is reduced to checking the water level in the battery once or twice a season. If you are handy, you can buy the separate pieces and hook them together as shown in the accompanying sketch or buy a kit that includes everything you need. Premier and Wellscroft sell kits (PRS 50 and PRS 100, page 77) and separate pieces. If your solar panel and battery are not matched in size by a solar engineer, use a charge controller to keep from overcharging and ruining the battery. Charge controllers are relatively cheap compared with batteries. Lots of charge controllers are on the market, some sealed in epoxy and weatherproof (better for outside), some not. Talk to someone knowledgeable about solar powered fences before ordering panels, batteries and controllers separately to build your own system. When you assemble your system, always attach the solar panel LAST. If you don’t, you can ruin the charge controller by exceeding its voltage rating. Twelve-volt solar panels can put out much more than 17v on a sunny day if no battery is installed to absorb the flow of current. When disconnecting the system, unhook the solar panel first. In other words, the PV panel is last to hook up and first to unhook. The battery must always be in the circuit before the final PV panel connection is made to keep the voltage from skyrocketing on a sunny day.
 |
If you have 110 VAC power near the fence, you can use that type of charger, which may be a little cheaper and avoids the cost of the battery and charging equipment. You can connect the energizer to the fence with double-insulated, underground-burial cable (Wellscroft) for about $0.45/foot. Don’t use any other type of wire to make an underground connection, or the effectiveness of the fence will suffer. A much cheaper option is to string a regular fence wire on insulators attached to tall poles to go from the 110 VAC energizer to the fence.
Accessories
These are handy when setting up or maintaining the electric fence:
long ground rod (cumbersome to ship; get it locally)
small radiator clamps to attach wire to ground rod
plain wire and alligator clips (stainless to avoid rust). Use these to connect the fence to the charger. Solder the ends of the stranded wire to avoid problems and maintain good conduction
fence tester (uses neon light bank; each light is 1000v; have at least three lights)
turkey baster and distilled water to top off battery if it’s not sealed
weed whacker or scythe. I pull up fence posts and move them back a foot, then whack the weeds before resetting the posts. The cleaner the fence, the better the deterrence.
multimeter (to see how much current is flowing into your battery, check the charging voltage and check that the charge controller is doing it’s job)
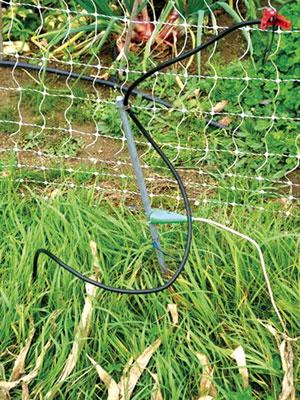 |
| Ground rod. Tomash photo. |
aluminum or copper wire to help connect the fence to the energizer. Wrap the stiff wire around a fence hot wire and then place an alligator clip from the energizer to the stiff wire. This makes a better connection than just clipping the alligator clip to the fence wire by itself.
Training Predators
An 8-foot-tall NON-electric, woven-wire or solid fence is 100 percent effective at excluding deer. An electric fence is a lot cheaper and easier to install – but is more of a psychological than physical barrier. Proper use of an electric fence requires understanding deer behavior–most importantly that if the area to be fenced has NOT been off limits to deer before, you must gradually deprive them of access. If possible, put the fence up BEFORE you plant a garden or orchard. For complete information on using electric fences with deer, see the 2010 Premier/Wellscroft catalog (page 58).
I have also had some success using little “flags” of aluminum foil smeared with peanut butter to train deer. They smell the peanut butter, touch their tongue to the foil and get a memorable shock. Not all people agree, but this worked for me.
Part of training is NEVER letting your guard down. Most animals figure out how to test the fence to see if it is energized without getting a serious shock. Leaving the fence off overnight invites disaster. If the corn is coming in, leave the fence on and the gate closed unless you are actually inside the garden. Raccoons will walk right through an open gate during the day for ripe corn.
Burrowing animals such as woodchucks will NOT usually burrow under an electric fence if they encounter the fence first. Rabbits, skunks, dogs, cats and other small mammals simply leave the fence alone. Turkeys usually walk around the fence unless you frighten them. If they fly they can land inside the fence. Don’t frighten them.
Safety and Maintenance
Electric fences are relatively safe but require precautions. Never touch an electric fence with your head, neck or upper torso, especially if the ground is moist. Don’t walk barefoot around these fences. If the fence is low enough to step over, always turn it off before stepping over. Getting tangled in the fence and being unable to reach the switch can be very unpleasant. Post signs near an electrified fence to notify visitors. Turn fences off if untrained visitors, especially children, are around. Be careful when urinating near an electric fence. Yeah, it happens.
For an electric fence to be most effective, the ground under it must be fairly free of weeds and the fence must be free of dead shorts against ground rods, earth staples, and metal stakes that are at the bottom of the fence posts. Moving the fence is so easy that mowing or trimming vegetation is quick and painless. A small weed whacker will not usually cut the fence lines, but to be safe, move the fence out of the way, trim, then replace it. A big, wheeled weed whacker can destroy a fence in the blink of an eye. Some people put mulch or plastic (or chemicals – ugh!) under the fence to suppress vegetation. Patrol the fence regularly, look for vegetation and listen for the “zap” of a dead short.
If you use a battery-powered energizer, check the fluid level in the battery at least once or twice per season. If your energizer has a low battery indicator on it, check that every night. I check the fence every night on my evening patrol. Most energizers have a light that flashes every time they send out a pulse of electricity. The rate of flashing changes, depending on the condition of the fence. Dry soil or heavy weed loads can make it flash slowly or even miss flashes. Pay attention to the fence when it is “healthy” and you can judge when it needs maintenance. Dry soil diminishes fence effectiveness, but it is hard to do much about it. One way around dry conditions is to use a special fence that has hot strands that alternate with isolated “ground” strands that are hooked directly to a ground rod pounded deep into the earth. This makes the condition of the surface around the fence or the insulating abilities of the predator’s (particularly deer) fur coat less of an issue. Pouring a bucket of water around the ground rod can also help.
In the fall roll the fence up carefully so that the poles are all together and the folds of fence webbing are stacked neatly on each other; then roll the webbing around the poles and tie with twine. Store this in a dry place out of direct sunlight to increase the life of the fence. The more carefully you put the fence away, the easier it is to put up next year.
Non-electric Barrier Fencing
As mentioned, 8-foot-high woven wire fence will keep deer out but is very expensive to install and, as with any “permanent” fencing, is difficult to keep free of vegetation. A cheaper alternative that gives some protection from low to moderate deer pressure is a black polypropylene netting called Deer-X.
Roberta Bailey, who uses this on her Vassalboro farm, says, “Deer-X fencing is a black polypropylene 3/4-inch mesh with UV inhibitors that comes in 7- x 100-foot lengths (FEDCO/OGS, $20). I use 6- to 7-foot metal garden stakes to support it. Spacing is about 10 to 15 feet between stakes, closer if deer pressure is stronger. The deer can’t see it and it spooks them. They don’t jump over it for the same reason. I have zero tolerance for deer pressure and this has kept them out for the 10 years I have used it. I have a lot of deer around that are not deterred by my old sleepy dog. It also keeps deer out of dry beans and other plantings that are far from the house.
“I also love that it is not very visible to my eye either. My eye is drawn to the plants, not the barrier. Cats and dogs quickly learn to nose their way under it. It does snag the occasional songbird. It is easy to set up and take down. Sometimes I place cardboard mulch covered with hay, straw or wood chips under it. I do this when I have placed it on the edge of a garden or berry patch, to reduce weedy edges from creeping into the patch and to keep grass from growing up into the mesh. If weeds or grass grow into the fencing, their removal may tear the mesh. With care, I get four to six years out of each section.”
Traps
Some traps kill animals; others trap them alive (Havahart™ traps). I generally use traps that kill small rodents because of their sheer numbers, and humane traps for bigger animals, such as woodchucks. Havahart™ traps are available in many sizes for all sorts of animals. I get by with one chipmunk-squirrel size and one raccoon-woodchuck size. The really big trap will catch the smaller animals as well as long as they can’t wiggle through the holes formed by the wire.
I usually put a pile of sunflower seed on the ground and set the trap over it. The animals usually set the trap off when they try to get at the seed under the trap bait trigger. Spring the trap every night or you will have skunks and raccoons to contend with the next morning. Both are nocturnal and are difficult to remove from the trap in daylight. Raccoons want to go back to sleep, and skunks – well, you know what they want to do.
My biggest animal problem is small rodents. I tolerate a few rodents, but when their populations become overwhelming, control is necessary.
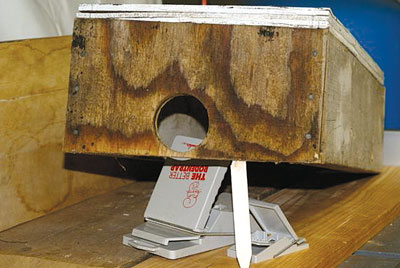 |
| The Better Mousetrap inside a homemade cover. Tomash photo. |
I learned my favorite trapping scheme from Eliot Coleman. It involves a commercial trap called “The Better Mousetrap” or “The Better Rodentrap” made by Intruder Inc. with a homemade cover. The traps come in mouse and rat size; I use both. The cover is just a bottomless box with two entrances (one on each end) large enough for the rodent to enter and tall enough not to interfere with the trap action. The trap cover helps avoid damage to non-target species (cats, birds, little humans). Just set the traps and place the cover over them. I use the traps mostly in the fall, when rodent populations surge. I also use them in cold frames that hold my fall Chinese vegetables. Mice will eat an entire 12-pound Napa cabbage quickly if you don’t trap them.
Use traps in hoop houses and under row covers too. In cold frames and under row covers, you do not need to cover the traps; just tuck them among the vegetables, as many as one trap per 2 square feet. You can also place traps with or without cover along the walls of outbuildings. Rodents like to run along walls to go from place to place. Instead of the cover, lean a board against the wall with a trap under it. Check the traps daily; they work only when they are unoccupied. You can empty and reset them with one hand. I empty them over a bare spot of ground; the dead rodent generally disappears overnight, feeding some deserving owl or bobcat.
The only significant damage from animals I have had in the open garden proper was from woods rats that liked to climb my broccoli plants and chew the entire growth tip just as they began to bud. Apparently the rats were small enough to slip through the bottom wires of the electric fence. I caught most of the rats with Intruder traps and salvaged a decent crop.
Assorted Oddball Strategies
Sometimes my corn didn’t seem to germinate evenly when, in fact, crows had pulled seedlings from the ground. Fences won’t protect corn from flying crows. Corn seems to attract crows only when it still has some of the seed attached to the shoot, so I germinate it in plug flats in a hoop house or cold frame around the first week of June, then transplant it in the garden 10 to 14 days later. When the corn is this big, crows don’t want it; the soil is warmer; and I get an even stand. Some truck farmers plant acres of corn this way.
 |
| A slug fence made from copper mesh, and close-up of the copper mesh. Tomash photos. |
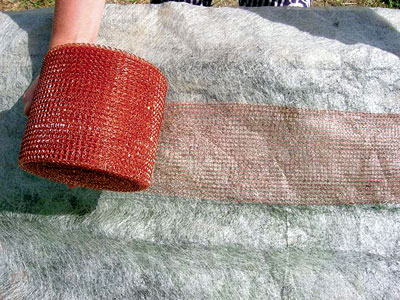 |
In the summer of 2009, most gardeners complained of SLUG problems. The weather was so damp for so long that populations exploded. We quickly deployed a deterrent that had worked in previous years: a flat, braided copper mesh that looks like a flattened Chore Boy or the armor that knights called “mail.” It comes in 100-foot rolls of a flattened tube from Lee Valley for $0.42/foot (“copper blocker,” Item # SS405 or SS407, www.leevalley.com/). We thread bamboo skewers from the grocery store through mesh fence placed around plants that are vulnerable to slugs, such as young carrot seedlings, lettuce, dahlias, etc. The erected fence is 5 inches high with two layers of mesh. When slugs touch the fence, their moist skin sets up a galvanic action between the copper mesh and the soil, and they get a shock. They avoid it if possible. Make sure they cannot slime their way under the fence. The fence will discolor but may be used for years.
Resources
Wellscroft Fencing (www.wellscroft.com/fence/fenceHome.html) is the Northeast dealer for Premier and other fencing supplies. You can save shipping on Premier products by buying from Wellscroft (in N.H.) rather than directly from Premier (in Iowa; www.premier1supplies.com). Premier offers free shipping on SOME items.
Deer-X fencing – www.fedcoseeds.com/ogs/search.php?item=9076&search=Deer-X-fencing
Havahart Traps – www.havahart.com/advice
Intruder Rodent Traps (www.intruderinc.com/) are a good design; a stainless steel spring closes the trap. They are very sensitive, easy to empty and reset with one hand, and reasonably priced.
Copper Blocker 5-inch by 100-foot flattened copper mesh tube
www.leevalley.com/garden/page.aspx?c=2&cat=2,51555,51241&p=51241